Refreshing Watermelon Galette Recipe
When it comes to summer desserts, few things are more delightful than a slice of galette. This rustic pastry, with its flaky crust and versatile fillings, invites creativity and experimentation in the kitchen. Today, we’re putting a refreshing twist on this classic French treat by using ripe, juicy watermelon as the star filling. The Watermelon Galette is not only a feast for the eyes but also a celebration of seasonal flavors, making it ideal for summer gatherings, picnics, and barbecues.
Understanding Galettes: A Rustic French Classic
Originating from the picturesque landscapes of France, galettes have been a beloved part of French cuisine for centuries. Traditionally, a galette is a free-form pastry, often made with a variety of fillings, wrapped in a simple crust and baked until golden brown. Unlike pies that come with a top crust, galettes are known for their rustic charm, allowing the filling to peek through in a casual, yet inviting manner. This carefree presentation makes them an excellent choice for both formal occasions and relaxed get-togethers.
The beauty of a galette lies in its versatility. While sweet fruit fillings are popular, galettes can also be filled with an array of savory ingredients, from roasted vegetables to cheese and meats. This adaptability means that whether you’re craving something sweet or savory, there’s a galette for every palate.
Ingredients Breakdown
Before diving into the step-by-step instructions, let’s take a closer look at the ingredients that make this Watermelon Galette a standout summer dessert.
Crust Ingredients
The foundation of any great galette is its crust. For our Watermelon Galette, we’ll be using:
– All-Purpose Flour: This serves as the base for the crust, providing the necessary structure and texture.
– Cold Butter: Using cold butter is crucial for achieving a flaky crust. As the butter melts during baking, it creates steam that helps puff up the layers of pastry.
– Ice Water: Chilled water is added to bind the flour and butter together without warming up the mixture, which is essential for maintaining a tender texture.
– Sugar: A touch of sugar enhances the flavor of the crust and adds a hint of sweetness.
– Salt: A pinch of salt balances the sweetness and enhances the overall flavor of the crust.
Filling Ingredients
The filling is where our Watermelon Galette truly shines. Here’s what you’ll need:
– Seedless Watermelon: The star of the show! Choose ripe, juicy watermelon for a naturally sweet and refreshing filling. Its high water content also makes it a perfect choice for a summer dessert.
– Honey or Agave Syrup: A drizzle of honey or agave syrup enhances the natural sweetness of the watermelon and helps to create a syrupy consistency as the galette bakes.
– Lime Zest and Juice: The bright acidity of lime adds a refreshing contrast to the sweetness of the watermelon, elevating the flavor profile of the galette.
– Vanilla Extract: A splash of vanilla adds depth and warmth to the filling, rounding out the flavors beautifully.
– Cornstarch: This ingredient is essential for thickening the filling, ensuring that the galette holds its shape and doesn’t become too runny when sliced.
Topping Ingredients
To elevate our Watermelon Galette even further, consider these optional toppings:
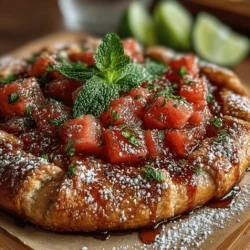
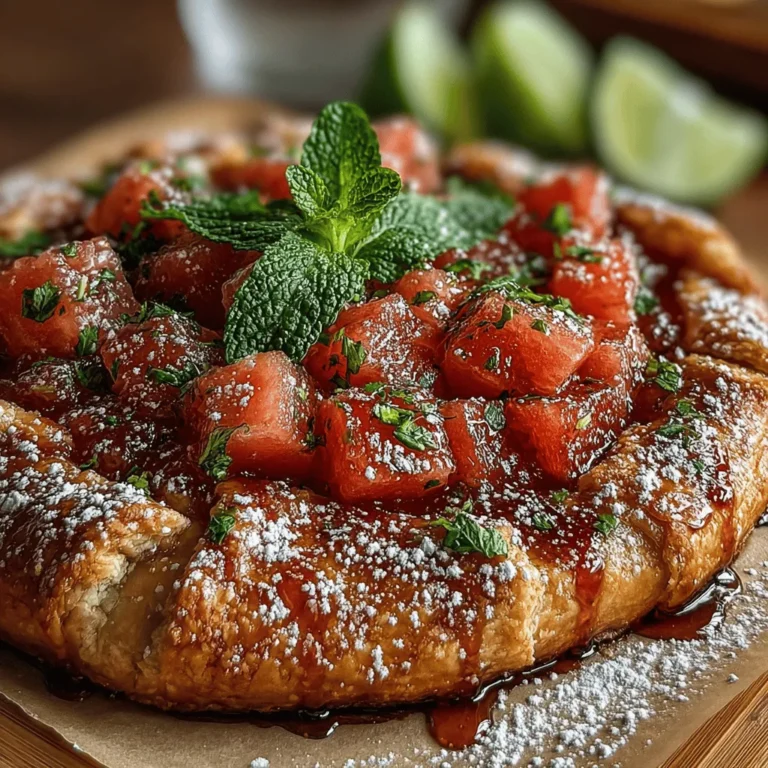
– Fresh Mint: Chopped fresh mint adds a burst of color and a refreshing herbal note that pairs perfectly with the sweetness of the watermelon.
– Powdered Sugar: For a touch of elegance, a light dusting of powdered sugar on top before serving can enhance presentation and add a hint of extra sweetness.
Step-by-Step Instructions for Making Watermelon Galette
Now that we have a good understanding of the ingredients, let’s get started with the first crucial step: making the galette crust.
Making the Galette Crust
1. Prepare the Ingredients: Begin by gathering all your ingredients. It’s important to work quickly, so having everything ready will help maintain the cold temperature of the butter.
2. Mix the Dry Ingredients: In a large mixing bowl, combine 1 ½ cups of all-purpose flour, 2 tablespoons of sugar, and a pinch of salt. Whisk the dry ingredients together until evenly combined.
3. Cut in the Butter: Take ½ cup (1 stick) of cold, unsalted butter and cut it into small cubes. Add the cubes of butter to the flour mixture. Using a pastry cutter, fork, or your fingers, work the butter into the flour until the mixture resembles coarse crumbs with pea-sized pieces of butter still visible. This process is crucial as it creates the flaky texture we desire.
4. Add Ice Water: Gradually add 4 to 6 tablespoons of ice water, one tablespoon at a time, mixing gently with a fork after each addition. You want to add just enough water for the dough to come together without being sticky. Once the dough starts to clump, stop adding water.
5. Form the Dough: Turn the dough onto a lightly floured surface and gather it into a ball. Flatten the ball into a disc shape. Wrap the disc in plastic wrap and refrigerate for at least 30 minutes. Chilling the dough allows the gluten to relax, resulting in a more tender crust.
As the dough chills, you can prepare the watermelon filling, ensuring that you’re ready to assemble your galette once the crust is ready.
This Watermelon Galette recipe not only showcases the vibrant flavors of summer but also invites you to embrace the rustic charm of homemade pastry. In the following sections, we’ll explore how to prepare the succulent watermelon filling and assemble the galette, ensuring that your summer gathering is a hit with this refreshing dessert.
{{image_2}}
Importance of Not Overmixing the Dough
When it comes to creating the perfect galette, one of the most critical steps is the preparation of the dough. To ensure a tender and flaky crust, it is essential to avoid overmixing the dough. Overmixing can lead to gluten formation, resulting in a tough texture rather than the desired light and flaky outcome. Instead, combine the ingredients gently, just until they come together. This method preserves the delicate nature of the dough, allowing the fat to remain in small pieces, which is crucial for achieving that irresistible flakiness in the final product.
Preparing the Watermelon Filling
Combining Ingredients and Letting Them Rest
Creating the watermelon filling is an essential step that enhances the overall flavor of the galette. Begin by carefully cutting the watermelon into small, uniform cubes. This ensures even distribution of the fruit throughout the galette. In a bowl, combine the watermelon cubes with sugar, cornstarch, and a splash of lemon juice. The sugar will draw out the natural juices of the watermelon, while the cornstarch helps to thicken it, preventing a soggy crust.
After mixing the ingredients, let them rest for about 15 to 20 minutes. This resting period allows the flavors to meld and the cornstarch to absorb some of the watermelon juice, creating a more cohesive filling. Remember, the goal is to maintain the watermelon’s natural texture while enhancing its flavor.
Handling Watermelon with Care
When working with watermelon, gentle handling is key. The flesh of the watermelon is delicate and can easily break apart if handled too roughly. Use a sharp knife to cut the watermelon into cubes, and avoid mashing it while mixing. This will help retain the fruit’s structure, providing a delightful burst of flavor in each bite of the galette.
Preheating and Rolling Out the Dough
Proper Oven Temperature for a Crispy Crust
Before rolling out your dough, it’s vital to preheat your oven to 400°F (200°C). A hot oven is crucial for achieving a crispy crust, as it allows the fat in the dough to melt quickly, creating steam that helps puff up the layers. This results in a beautifully baked galette with a golden-brown finish.
Tips for Rolling Out Dough Evenly
Once the dough has rested in the refrigerator, it’s time to roll it out. Sprinkle a lightly floured surface with flour to prevent sticking. Begin by flattening the dough into a disk with your hands, then use a rolling pin to gently roll it out into a circle about 12 inches in diameter. Aim for an even thickness of about 1/8 inch. If the dough becomes too sticky, add a little more flour, but be cautious not to incorporate too much, as this can also lead to a tougher crust.
Assembling the Galette
Transferring the Dough and Arranging the Filling
After rolling out the dough, carefully transfer it to a parchment-lined baking sheet. This can be done by rolling the dough onto the rolling pin and then unrolling it onto the baking sheet. Once positioned, it’s time to arrange the watermelon filling at the center of the dough, leaving about a 2-inch border around the edges.
Creating Pleats and Folding the Dough
To achieve the rustic look characteristic of a galette, fold the edges of the dough over the filling, creating pleats as you go. This not only enhances the visual appeal of your dessert but also helps to contain the filling while allowing the galette to bake evenly. The open center of the galette showcases the beautiful watermelon filling, making it a stunning centerpiece for any gathering.
Baking the Galette
Knowing When the Galette is Perfectly Baked
Bake the galette in the preheated oven for about 30 to 35 minutes, or until the crust is golden brown and crisp. Keep an eye on the galette during the last few minutes of baking to ensure it doesn’t overcook. The filling should be bubbling slightly, indicating that the flavors have melded beautifully.
Cooling Time for Serving
Once the galette is out of the oven, allow it to cool on the baking sheet for 10 to 15 minutes. This cooling period is essential, as it lets the filling set slightly, making it easier to slice and serve. If you attempt to cut the galette while it’s still too hot, you may end up with a messy presentation.
Serving Suggestions
Presenting the Galette Attractively
To serve the watermelon galette, slice it into wedges and arrange them on a serving platter. For an added touch, consider garnishing with fresh mint leaves or a dusting of powdered sugar. These simple additions elevate the presentation and enhance the fresh flavors of the dessert.
Serving Options: Warm, Room Temperature, or Chilled
This galette can be enjoyed warm, at room temperature, or even chilled. Each option provides a different experience; warm slices offer a comforting dessert, room temperature slices are perfect for casual gatherings, and chilled servings provide a refreshing treat on hot summer days. Pair the galette with a scoop of vanilla ice cream or whipped cream for an indulgent twist.
Nutritional Insights
Watermelon is not only refreshing but also packed with health benefits. It is composed of about 92% water, making it an excellent choice for hydration, especially during the warmer months. Additionally, watermelon is rich in vitamins A and C, both of which contribute to overall health and skin vitality. The addition of fresh ingredients in this galette balances indulgence with nutrition, allowing you to enjoy a delicious dessert without the guilt.
Conclusion
Making and enjoying a watermelon galette is a delightful experience that combines fresh flavors with a touch of creativity. This recipe not only brings a burst of summer to your table but also encourages you to explore variations with different fillings, such as peaches, berries, or even a mix of seasonal fruits. The rustic charm of a galette makes it a versatile dessert suitable for any occasion, from casual family dinners to festive summer gatherings. Embrace the joy of baking and let your culinary creativity shine as you whip up this deliciously refreshing watermelon galette.