Introduction
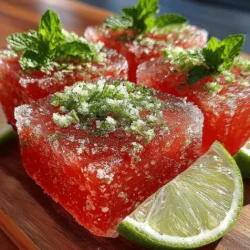
As the summer sun blazes overhead, the quest for a refreshing treat that can both cool you down and delight your taste buds becomes paramount. Enter the Refreshing Frozen Watermelon Lime Bars—a vibrant and invigorating dessert that perfectly encapsulates the essence of summer. These bars are a harmonious blend of sweet watermelon and zesty lime, making them an ideal choice for anyone looking to indulge in something both delicious and health-conscious. With their minimal ingredient list and straightforward preparation, these frozen delights are perfect for everyone from novice cooks to seasoned culinary enthusiasts. Whether you’re hosting a backyard barbecue, lounging by the pool, or simply seeking a quick way to beat the heat, these watermelon lime bars are bound to become a favorite.
Understanding the Ingredients
Watermelon: The Star of the Show
At the heart of the Refreshing Frozen Watermelon Lime Bars lies watermelon, a quintessential summer fruit celebrated for its hydrating properties. Watermelon is over 90% water, making it an excellent choice for staying hydrated during the hot months. Beyond hydration, this vibrant fruit is packed with essential vitamins, particularly vitamins A and C, which are crucial for maintaining healthy skin and a robust immune system. Moreover, watermelon is low in calories, allowing you to indulge without the guilt. Its natural sweetness serves as a perfect base for these frozen bars, providing a refreshing flavor that pairs beautifully with the tartness of lime.
Lime Juice and Zest: A Zesty Kick
To balance the sweetness of the watermelon, fresh lime juice and zest play a crucial role in this recipe. The bright acidity of limes not only enhances the overall flavor profile but also adds a refreshing zing that elevates each bite. Limes are rich in vitamin C, an antioxidant that helps to boost the immune system and promote healthy skin. Additionally, the zest of the lime contributes essential oils that intensify the citrusy aroma, making these bars not just delicious but also aromatic. This dynamic duo of watermelon and lime creates a delightful contrast that keeps your palate engaged.
Sweeteners: Honey vs. Agave Syrup
When it comes to sweetening your watermelon lime bars, you have a couple of delightful options: honey and agave syrup. Both sweeteners have unique flavor profiles that can enhance the taste of your bars. Honey, with its floral notes and thicker consistency, adds a rich depth of flavor. It’s also known for its health benefits, such as its antibacterial properties and potential to soothe sore throats. On the other hand, agave syrup is a plant-based sweetener derived from the agave plant. It has a milder flavor and is often favored for its low glycemic index, making it a better choice for those monitoring their blood sugar levels. Choosing between honey and agave syrup ultimately depends on your personal preference and dietary needs, ensuring that your frozen bars are tailored to your taste.
Sea Salt: Enhancing the Flavors
Though it may seem counterintuitive, adding a pinch of sea salt to your mixture can significantly elevate the overall flavor of your watermelon lime bars. Salt acts as a flavor enhancer, helping to bring out the natural sweetness of the watermelon while balancing the tartness of the lime. This subtle addition contributes to a more complex taste profile, making each bite more enjoyable. It’s a small yet impactful step that can elevate your frozen treats from good to exceptional.
Optional Garnish: Fresh Mint Leaves
To further enhance the visual appeal and flavor of your frozen watermelon lime bars, consider garnishing them with fresh mint leaves. Mint not only adds a pop of color but also introduces a refreshing aroma that complements the flavors of watermelon and lime. The coolness of mint works harmoniously with the fruity notes, making every bite a delightful experience. Plus, mint is known for its digestive properties, adding another layer of health benefits to your summer treat.
Step-by-Step Guide to Making Frozen Watermelon Lime Bars
Preparing the Watermelon
The first step in creating your Refreshing Frozen Watermelon Lime Bars is selecting the perfect watermelon. Aim for a seedless variety, as these are easier to work with and yield a smoother texture in your final product. When choosing a watermelon, look for one that feels heavy for its size and has a uniform shape without any irregularities. The skin should be firm and have a vibrant color. Once you’ve selected your watermelon, it’s time to prepare it for blending. Start by cutting the watermelon in half, then slice it into manageable quarters. Carefully remove the rind and chop the flesh into cubes. This will make it easier to blend and ensure a uniform consistency in your bars.
Blending the Ingredients
Once your watermelon is prepped, it’s time to blend the ingredients together. Place the watermelon cubes into a blender and pulse until smooth. For the best results, blend in batches if your blender is small, as this will ensure that all the watermelon is evenly pureed. The goal is to achieve a silky smooth texture without any lumps. If you find that the mixture is too thick, you can add a splash of water or lime juice to help it blend more easily. As you blend, take a moment to appreciate the vibrant color and fresh aroma of the watermelon—this is the essence of summer in a blender.
Mixing and Adjusting Flavors
After blending the watermelon, it’s time to mix in the lime juice and zest, along with your chosen sweetener. Start with the juice of one lime, adding more if you prefer a tangier flavor. Incorporate your sweetener gradually, tasting as you go to find the perfect balance of sweetness and tartness. This step is crucial, as personal preferences for sweetness can vary widely. If you’re using honey, remember that it may add a distinct flavor, while agave syrup will keep the taste more neutral. Once the mixture is well combined, give it a final taste test, adjusting the lime and sweetener until it reaches the desired flavor profile. This is your chance to create a refreshing treat that perfectly matches your palate.
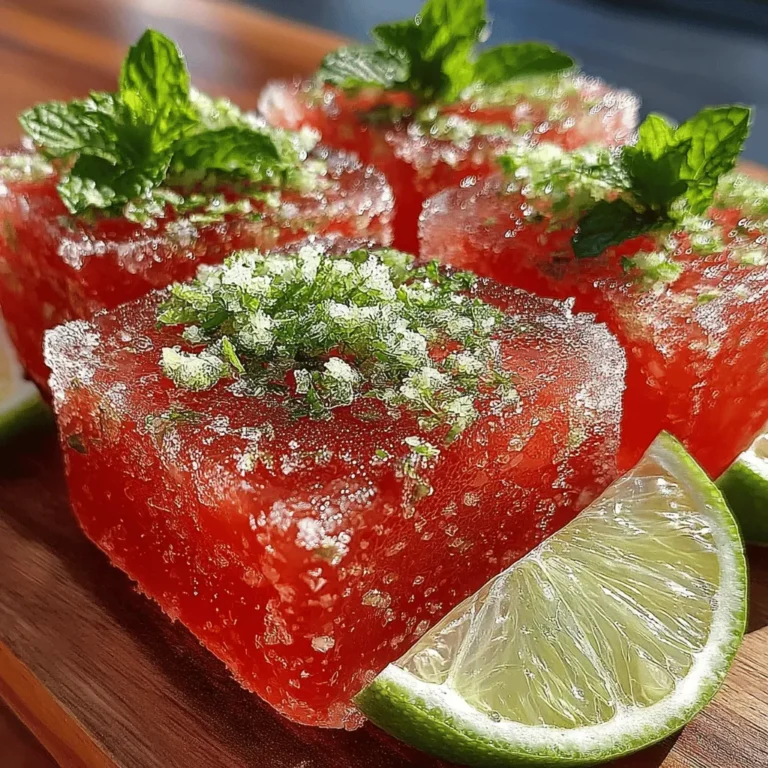
By following these initial steps, you’ll be well on your way to creating a batch of Refreshing Frozen Watermelon Lime Bars that are not only delicious but also a healthy way to enjoy the summer heat. Stay tuned as we continue to explore the freezing process and creative serving ideas in the next part of this article.
{{image_2}}
Preparing the Mold for Freezing
When it comes to freezing your watermelon lime mixture, selecting the right mold is crucial for achieving the perfect bar texture and ease of removal. You have two great options: a greased baking dish or a silicone mold.
Greased Baking Dish
Using a traditional baking dish is a popular choice due to its availability and ease of use. To prepare the dish, simply grease it with a bit of coconut oil or cooking spray to prevent the mixture from sticking. This approach works best if you plan to cut the bars into squares or rectangles. The greased surface allows for smoother removal after freezing.
However, one downside is that the mixture may stick slightly if not greased adequately. To avoid this, ensure that you cover all corners and the bottom of the baking dish thoroughly.
Silicone Mold
Silicone molds, on the other hand, are an excellent option for those looking for easy removal and fun shapes. They are naturally non-stick, which means you won’t need to grease them at all. This is particularly beneficial if you want to create smaller, bite-sized pieces or fun shapes that kids will love.
When using a silicone mold, fill each cavity to the top, but do not overfill, as the mixture may expand slightly as it freezes. Additionally, make sure to place the mold on a firm surface, like a cutting board or a baking tray, before pouring in the mixture. This will make it easier to transfer to the freezer without spilling.
Freezing Process
Once you have your mold prepared, pour the watermelon lime mixture into your chosen container. Ensure that the mixture is evenly distributed for consistent freezing. Now comes the most challenging part—patience.
Place your filled mold in the freezer and let it chill for about 4 to 6 hours, or until completely solid. The exact freezing time can vary depending on your freezer’s temperature and the thickness of the mixture. While waiting, try to resist the temptation to check too frequently, as opening the freezer can introduce warmth and prolong the freezing process.
To test if they are ready, gently press the surface with your finger; if it feels solid and firm, your frozen bars are good to go!
Cutting and Serving the Bars
After your watermelon lime bars have reached the desired consistency, it’s time to cut and serve them. If you used a baking dish, remove it from the freezer and let it sit at room temperature for about 5 minutes. This short wait will make cutting easier. Use a sharp knife to slice the mixture into bars of your preferred size—typically, 2-inch by 4-inch rectangles work well.
If you used a silicone mold, gently twist and flex the mold to release the bars. They should pop out easily without any sticking. For a more polished presentation, place the bars on a serving platter and garnish with lime zest or fresh mint leaves for an added touch.
Serving Sizes and Presentation Tips
For serving, keep in mind that these bars are quite refreshing and can serve as a light dessert or snack. A serving size of one or two bars per person is generally sufficient, especially after a meal.
For a fun twist, consider serving the bars with a drizzle of honey or a dollop of whipped yogurt on the side. Alternatively, pair them with a fruity summer salad or a scoop of sorbet for an impressive dessert display.
Benefits of Making Frozen Watermelon Lime Bars at Home
Healthier Alternative to Store-Bought Treats
One of the biggest advantages of making frozen watermelon lime bars at home is the control you gain over the ingredients. Unlike many store-bought treats, which often contain excessive sugars and preservatives, your homemade version allows you to adjust the sweetness to your liking. You can use ripe, fresh watermelon and natural sweeteners like honey or agave syrup, providing a healthier option for indulgence.
Additionally, by omitting artificial flavors and colors, you can enjoy a guilt-free treat that’s packed with nutrients. Watermelon is hydrating and loaded with vitamins A and C, making these bars not only delicious but also beneficial for your health.
Versatility of the Recipe
Another fantastic aspect of this recipe is its versatility. While watermelon and lime create a refreshing combination, feel free to experiment with different fruits based on seasonal availability. Strawberries, mangoes, or even blueberries can be blended into the mixture for a colorful twist. You can also adjust the tartness by adding more or less lime juice, catering the flavor profile to your personal preference.
This adaptability makes it perfect for any occasion or season, allowing you to keep the recipe fresh and exciting every time you make it.
Perfect for Summer Gatherings
As the weather warms up, these watermelon lime bars become a delightful addition to any summer gathering. Whether you’re hosting a picnic, barbecue, or simply enjoying a sunny day in your backyard, these bars are sure to be a hit. Their vibrant colors and refreshing flavor will attract guests of all ages, making them an ideal treat for kids and adults alike.
Serve them as a fun dessert option or a refreshing snack between activities. Their easy preparation and appealing presentation make them a go-to recipe for summer festivities.
Nutritional Information and Serving Suggestions
Nutritional Breakdown
Understanding the nutritional benefits of your homemade frozen watermelon lime bars can help you enjoy them with confidence. Here’s a general breakdown per serving (assuming two bars):
– Calories: Approximately 80-100 calories
– Sugar: Roughly 15 grams (natural sugars from watermelon)
– Fat: 0 grams
– Protein: 1 gram
– Vitamins: High in vitamin C and A, providing essential nutrients for skin and immune health.
This breakdown emphasizes how these bars can fit into a balanced diet while still satisfying your sweet tooth.
Creative Serving Ideas
To enhance your serving experience, consider pairing these bars with other summer snacks. For instance, they make a perfect complement to a fresh fruit salad, adding a refreshing contrast. You could also serve them alongside grilled meats or seafood for a fun and flavorful meal.
For dessert, these bars can be a fantastic addition to a sundae bar, allowing guests to mix and match flavors. You could encourage creativity by offering toppings like granola, shredded coconut, or chopped nuts.
Conclusion
The Refreshing Frozen Watermelon Lime Bars are not just a delicious treat; they encapsulate the essence of summer with their vibrant colors and refreshing flavors. This recipe is a testament to how simple ingredients can come together to create something truly delightful and satisfying. Whether enjoyed on a hot day or shared with friends and family, these bars are sure to bring joy to any occasion. So, grab your ingredients and start blending—your taste buds will thank you!