Frozen Yogurt S’mores Granola Bars: A Wholesome Delight
When it comes to satisfying sweet cravings while maintaining a health-conscious lifestyle, few treats can match the appeal of Frozen Yogurt S’mores Granola Bars. This delightful recipe combines the nostalgic flavors of classic campfire s’mores with the wholesome goodness of homemade granola, creating a snack that is both indulgent and nutritious. Whether you’re a parent looking for a fun and healthy treat for the kids, an individual committed to clean eating, or simply a snack enthusiast seeking new flavors, these granola bars are a perfect choice.
The beauty of Frozen Yogurt S’mores Granola Bars lies in their easy preparation and the versatility of their ingredients. With just a handful of components, you can whip up a batch of these bars in no time, making them an ideal option for any occasion—from family gatherings to after-school snacks, or even a refreshing dessert on a hot day.
The Inspiration Behind Frozen Yogurt S’mores Granola Bars
The concept of s’mores dates back to the early 20th century, with the first recorded recipe appearing in a Girl Scouts publication in 1927. Traditionally made with graham crackers, chocolate, and toasted marshmallows, s’mores have become synonymous with summer camping trips and outdoor adventures. Their delightful combination of flavors and textures evokes a sense of nostalgia, making them a beloved treat for many. However, while the classic version is undeniably delicious, it often falls short in terms of nutrition.
In response to the growing demand for healthier snacks, innovative home cooks have reimagined the beloved s’mores treat, leading to the creation of Frozen Yogurt S’mores Granola Bars. This modern twist not only preserves the original flavors but also enhances the nutritional profile by incorporating wholesome ingredients that cater to a variety of dietary preferences.
Granola bars have gained immense popularity in recent years as a convenient snack option. They are often marketed as healthy on-the-go choices, but many store-bought varieties are loaded with added sugars and artificial ingredients. Making granola bars at home allows you to control the ingredients, ensuring that you can create a delicious snack that aligns with your health goals. This recipe for Frozen Yogurt S’mores Granola Bars is a perfect example of how you can enjoy a classic treat while reaping the benefits of wholesome ingredients.
Key Ingredients and Their Benefits
To create these irresistible Frozen Yogurt S’mores Granola Bars, you’ll need a selection of simple yet nutritious ingredients. Each component plays a crucial role in both the flavor and health benefits of the bars:
– Old-Fashioned Rolled Oats: The foundation of your granola bars, rolled oats are rich in fiber and essential nutrients. They provide a hearty base that keeps you feeling full and satisfied, making them an excellent choice for a snack.
– Graham Cracker Crumbs: These crumbs add a touch of sweetness and the signature crunch associated with traditional s’mores. Their flavor profile is reminiscent of campfire evenings, making them an essential ingredient in this recipe.
– Sliced Almonds (or Nuts): Including nuts in your granola bars not only elevates their texture but also enhances their nutritional value. Almonds are packed with healthy fats, protein, and important vitamins and minerals, making them a great addition for sustained energy.
– Mini Marshmallows: Adding mini marshmallows brings a nostalgic element to the bars while providing a delightful chewy texture. They evoke the essence of classic s’mores and are sure to be a hit with both kids and adults.
– Dark Chocolate Chips or Chunks: Rich in antioxidants, dark chocolate adds depth of flavor and a hint of indulgence to the bars. Opting for dark chocolate over milk chocolate means you’re not just treating your taste buds, but also providing your body with beneficial compounds.
– Honey or Maple Syrup: These natural sweeteners are healthier alternatives to refined sugars. They enhance the flavor of the bars while providing a touch of sweetness that complements the other ingredients beautifully.
– Coconut Oil: Known for its healthy fats, coconut oil contributes a creamy texture to the granola bars. It helps bind the ingredients together while adding a subtle coconut flavor that pairs well with the other components.
– Plain Greek Yogurt: This ingredient is key to achieving the frozen element of the bars. Greek yogurt is an excellent source of protein and adds creaminess, making the bars satisfying and nourishing.
– Vanilla Extract and Salt: A splash of vanilla extract enhances the overall flavor profile, while a pinch of salt balances the sweetness, allowing all the flavors to shine through.
– Optional Toppings: To elevate the presentation and taste of your granola bars, consider adding optional toppings like additional chocolate chips, crushed nuts, or a sprinkle of sea salt. These can add texture and visual appeal, making your homemade bars even more enticing.
Step-by-Step Guide to Making Frozen Yogurt S’mores Granola Bars
Now that we’ve covered the inspiration and key ingredients, let’s dive into the preparation process. Making Frozen Yogurt S’mores Granola Bars is straightforward, requiring just a few essential steps to bring this delicious treat to life.
1. Prepare Your Baking Dish: Begin by lining an 8×8-inch baking dish with parchment paper. This will ensure that your granola bars come out easily once they are set.
2. Mix Dry Ingredients: In a large mixing bowl, combine the old-fashioned rolled oats, graham cracker crumbs, sliced almonds, and dark chocolate chips. Stir the mixture until all the dry ingredients are evenly distributed.
3. Create the Wet Mixture: In a separate bowl, mix together the coconut oil, honey (or maple syrup), and vanilla extract. Microwave the mixture for about 20-30 seconds if the coconut oil is solid, just until it melts and combines smoothly.
4. Combine Mixtures: Pour the wet mixture over the dry ingredients. Gently fold everything together until the oats and nuts are thoroughly coated. Finally, add in the mini marshmallows and fold them in gently to avoid breaking them apart.
5. Pack the Mixture Into the Dish: Transfer the granola mixture into the prepared baking dish. Use a spatula or your hands to firmly press the mixture down into an even layer. This step is crucial, as it will help the bars hold together once frozen.
By following these initial steps, you’re well on your way to creating a delicious batch of Frozen Yogurt S’mores Granola Bars that will delight your taste buds and satisfy your snack cravings. In the following sections, we’ll delve deeper into the freezing process and explore some creative variations you can try to make these bars your own.
{{image_2}}
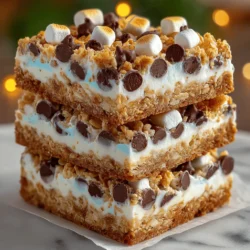
Creating the perfect Frozen Yogurt S’mores Granola Bars involves precise steps that ensure a delightful snacking experience. These bars are not only delicious but also a healthier alternative to traditional s’mores, combining the creamy richness of yogurt with the crunch of granola and the sweetness of chocolate and marshmallows. Follow the detailed instructions below to make these fantastic treats.
Preparation Tips for the Baking Pan
Before diving into the recipe, it’s essential to prepare your baking pan correctly. Line an 8×8 inch square baking dish with parchment paper, allowing the paper to hang over the edges. This will make it much easier to lift the bars out once they are frozen. To ensure the parchment sticks in place, lightly grease the bottom of the pan with cooking spray or a small amount of coconut oil. This step will prevent the granola bars from sticking and ensure a clean, easy removal.
Mixing Dry Ingredients
The first step in creating your granola bars is to mix your dry ingredients. In a large mixing bowl, combine rolled oats, crushed graham crackers, mini chocolate chips, and a pinch of salt. It’s important to distribute these ingredients evenly to ensure that every bite has a consistent flavor. Use a whisk or spatula to combine the ingredients thoroughly. This not only enhances the flavor but also contributes to the overall texture of the bars.
Preparing the Wet Mixture
Next, prepare the wet mixture that will bind your bars together. In a medium saucepan over low heat, combine honey (or maple syrup for a vegan option), nut butter (such as almond or peanut butter), and vanilla extract. Stir the mixture continuously until it is smooth and well-combined. It’s crucial to ensure that there are no lumps in the nut butter, as this will affect the final texture of your granola bars. Once completely smooth, remove the saucepan from heat and allow it to cool for a few minutes.
Combining Wet and Dry Ingredients
Now it’s time to combine the wet and dry ingredients. Pour the warm wet mixture over the dry ingredients and use a spatula to mix everything together. The goal is to ensure that all the dry ingredients are well-coated with the wet mixture. Take your time during this step; thorough mixing is essential for achieving the right texture and for the bars to hold together properly. Once combined, you should have a sticky mixture that holds its shape when pressed.
Transferring to the Pan
Once your mixture is ready, transfer it to the prepared baking pan. Use the back of a spatula or your hands (slightly dampened to prevent sticking) to firmly press the mixture into an even layer at the bottom of the pan. It’s important to compact the mixture well to prevent the bars from crumbling when cut. The denser you pack it, the better the bars will hold together after freezing.
Adding Toppings
For a fun twist, consider adding toppings before freezing the bars. You can sprinkle extra mini chocolate chips, crushed graham crackers, or even some toasted coconut on top. For a more indulgent treat, drizzle melted chocolate over the top. Feel free to get creative with your toppings; this is your chance to personalize the bars!
Freezing Process
Once you’ve added your toppings, it’s time to freeze the mixture. Cover the baking pan with plastic wrap or aluminum foil and place it in the freezer. Allow sufficient time for freezing—at least 4 hours, but overnight is ideal. This extended freezing time ensures that the bars achieve the desired firm texture and makes slicing easier.
Cutting and Serving
After the bars have frozen solid, it’s time to cut and serve. Remove the bars from the pan using the overhanging parchment paper and place them on a cutting board. Using a sharp knife, cut them into squares or rectangles, depending on your preference. To present them beautifully, consider placing the bars on a decorative plate, or wrapping them individually in parchment paper tied with twine for a rustic touch.
Creative Serving Suggestions
These Frozen Yogurt S’mores Granola Bars can be enjoyed in various creative ways:
– Pairing with Fresh Fruits or Yogurt: Serve the bars alongside a bowl of fresh berries or a dollop of yogurt for a balanced snack. The freshness of the fruit enhances the overall flavor and adds a nutritious element to your treat.
– Skewered Mini Marshmallows: For a playful presentation, serve the bars with skewers of mini marshmallows. Guests can toast the marshmallows over a flame for a fun, interactive experience, reminiscent of traditional s’mores.
– Themed Parties or Gatherings: These granola bars are perfect for summer barbecues, birthday parties, or picnics. They can be a delightful addition to dessert tables or serve as a refreshing treat for outdoor gatherings, keeping everyone cool and satisfied.
Storage and Shelf Life
To store your Frozen Yogurt S’mores Granola Bars, place them in an airtight container. Layering parchment paper between the bars can help prevent them from sticking together. When properly stored, these granola bars can last in the freezer for up to 3 months. However, to enjoy the best flavor and texture, it’s ideal to consume them within the first month of freezing. Over time, the texture may become slightly softer, and the flavors may dull, so make sure to keep an eye on your supply!
Nutritional Information
Here’s a brief breakdown of the nutritional content per serving (1 bar):
– Calories: Approximately 150
– Protein: 4g
– Fat: 6g
– Carbohydrates: 24g
– Fiber: 3g
– Sugar: 8g
These bars can be adjusted for dietary preferences. For a gluten-free option, use certified gluten-free oats and gluten-free graham crackers. To make them vegan, substitute honey with maple syrup and ensure that your chocolate chips are dairy-free.
Conclusion
Frozen Yogurt S’mores Granola Bars are a delightful fusion of health and indulgence. They offer a guilt-free treat that satisfies sweet cravings while providing essential nutrients. With their customizable ingredients and easy preparation, these bars are perfect for anyone looking to enjoy a refreshing snack without compromising on taste. Try making these bars today, and embrace the deliciousness that brings the best of both worlds—indulgence and health—together in one bite.