Introduction
In the world of frozen treats, frozen yogurt has surged in popularity, celebrated for its creamy texture and guilt-free indulgence. Unlike traditional ice cream, which can be high in calories and sugar, frozen yogurt offers a lighter alternative that satisfies sweet cravings while providing a range of health benefits. Packed with probiotics, frozen yogurt can be a delightful way to enjoy a treat that also supports gut health.
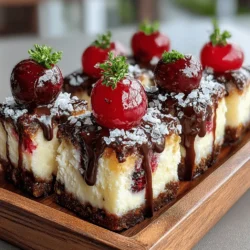
Enter the Frozen Yogurt Chocolate Cherry Cubes—an innovative recipe that elevates the classic frozen yogurt experience. These bite-sized cubes combine the creamy goodness of yogurt, the natural sweetness of cherries, and the rich flavor of dark chocolate, creating a snack that is both delicious and nutritious. Perfect for warm days or as a satisfying dessert, these cubes are an easy way to enjoy a balanced treat that feels decadent without the guilt.
The appealing combination of yogurt, cherries, and dark chocolate in this recipe not only tantalizes the taste buds but also offers a wealth of nutritional benefits. With Greek yogurt as the base, fresh or frozen cherries for a burst of flavor, and dark chocolate for a touch of indulgence, these Frozen Yogurt Chocolate Cherry Cubes are a versatile snack that can be enjoyed by all ages.
Understanding the Ingredients
To create the perfect Frozen Yogurt Chocolate Cherry Cubes, it is essential to understand the role of each ingredient. This will not only help in achieving the desired flavor and texture but also enhance the nutritional profile of your treat.
Greek Yogurt: At the heart of this recipe is Greek yogurt, known for its thick, creamy consistency and rich protein content. Compared to regular yogurt, Greek yogurt is strained to remove excess whey, resulting in a denser product that is not only satisfying but also beneficial for digestion. It’s an excellent source of calcium and probiotics, making it a popular choice for those looking to maintain a healthy lifestyle. The tartness of Greek yogurt pairs beautifully with sweet ingredients, making it an ideal base for these frozen cubes.
Cherries: Cherries are not only delicious but also packed with health benefits. They are rich in antioxidants, vitamins, and minerals, which can help reduce inflammation and promote overall health. In this recipe, you can choose between fresh and frozen cherries, depending on seasonal availability. Fresh cherries offer a burst of juicy flavor, while frozen cherries are convenient and can be used year-round. When selecting cherries, look for those that are firm and plump, as these qualities will enhance the overall taste of your frozen yogurt cubes.
Honey and Maple Syrup: To sweeten the yogurt base naturally, this recipe incorporates honey and maple syrup. Both of these natural sweeteners bring unique flavor profiles; honey adds a floral sweetness, while maple syrup introduces a warm, caramel-like taste. Using natural sweeteners allows you to control the sweetness level while avoiding refined sugars, making your frozen treat a healthier option.
Dark Chocolate: No dessert would be complete without a touch of chocolate, and dark chocolate is the perfect addition to these cubes. Rich in antioxidants, dark chocolate has been linked to various health benefits, including improved heart health and enhanced brain function. When choosing dark chocolate for this recipe, aim for a variety with at least 70% cocoa content to maximize health benefits while minimizing added sugars.
Coconut Oil: While optional, coconut oil can enhance the texture of your chocolate coating. It helps to create a smooth melt-in-your-mouth consistency that complements the creamy yogurt base. Additionally, coconut oil offers healthy fats that can provide sustained energy. If you prefer a dairy-free alternative, coconut oil is a great option to consider.
Sea Salt: Lastly, a pinch of sea salt can elevate the flavors in your Frozen Yogurt Chocolate Cherry Cubes. Salt acts as a flavor enhancer, bringing out the sweetness of the cherries and balancing the richness of the chocolate. It’s a small addition that can make a significant impact on the overall taste.
Preparation Steps Explained
Now that we’ve covered the ingredients, it’s time to dive into the preparation steps to create your Frozen Yogurt Chocolate Cherry Cubes. This recipe is straightforward and requires minimal equipment, making it an accessible option for home cooks of all skill levels.
Preparing the Cherries: The first step is to prepare the cherries. If you’re using fresh cherries, rinse them thoroughly under cold water and remove the pits. Pitting cherries can be a bit tedious, but it’s necessary to ensure a smooth texture in your yogurt cubes. If you opt for frozen cherries, you can skip this step; just make sure to thaw them slightly and drain any excess liquid before using. Regardless of the type of cherries you choose, aim for uniform pieces to ensure even distribution in the yogurt mixture.
Mixing the Yogurt Base: Next, you’ll want to mix the yogurt base. In a mixing bowl, combine the Greek yogurt with your chosen sweeteners—honey and maple syrup. Start with a small amount of sweetener and adjust according to your taste preference. Use a whisk or spatula to blend the ingredients until they are smooth and creamy. For an even creamier consistency, consider using a handheld mixer for a minute or two. The goal is to achieve a luscious, velvety texture that will freeze beautifully.
Once the yogurt is well combined, gently fold in the prepared cherries. Be careful not to overmix, as you want to maintain the integrity of the cherry pieces. The vibrant red of the cherries will create a visually appealing contrast against the white yogurt, making your frozen cubes even more enticing.
With the yogurt mixture ready, the next step involves pouring it into an ice cube tray or silicone mold. Silicone molds are particularly useful as they allow for easy removal of the frozen cubes once they are set. Fill each compartment with the yogurt-cherry mixture, leaving a little space at the top for expansion as they freeze.
After filling the molds, place them in the freezer for several hours, or until the cubes are completely frozen. This step is crucial, as it ensures that the yogurt holds its shape when removed from the molds.
Stay tuned for the next part of this article, where we will cover the chocolate coating process, the final touches, and tips for storing and serving your Frozen Yogurt Chocolate Cherry Cubes!
{{image_2}}
Creating the perfect Frozen Yogurt Chocolate Cherry Cubes involves more than just mixing ingredients; it requires attention to detail in every step. This section will guide you through the techniques for incorporating cherries, filling molds, melting chocolate, and freezing your delightful cubes. Additionally, we’ll cover nutritional information, serving suggestions, and a recap of why this treat is a must-try.
Incorporating the Cherries
When it comes to adding cherries to your yogurt mixture, the goal is to achieve even distribution without breaking the fruit. Here are some effective techniques:
1. Choose the Right Cherries
Use fresh or frozen cherries, ensuring they are pitted and halved. Frozen cherries can add a delightful chill to the mix, but fresh ones offer a firmer texture. If you opt for frozen, allow them to thaw slightly before use to prevent excess moisture from affecting the yogurt consistency.
2. Gently Fold in the Cherries
Once you have your yogurt base ready, gently fold in the halved cherries using a spatula. This technique minimizes the risk of breaking the fruit while ensuring an even distribution throughout the mixture. Aim to incorporate the cherries without overmixing to maintain the yogurt’s creamy texture.
3. Test for Balance
Before pouring the mixture into molds, take a small spoonful to check the balance of yogurt and cherries. Adjust by adding more yogurt or cherries as needed to achieve your desired flavor profile.
Filling the Molds
Choosing the right molds and ensuring even filling is crucial for uniformity in your Frozen Yogurt Chocolate Cherry Cubes.
1. Selecting the Molds
Silicone molds are highly recommended for this recipe. They are flexible, making it easy to pop out the frozen cubes later. You can find molds in various shapes and sizes—fun shapes for kids or classic cubes for adults. Make sure the molds are clean and dry before filling.
2. Ensuring Even Filling
Use a ladle or a measuring cup to fill each mold evenly. If you want a layered effect, fill the molds halfway with yogurt, then add a layer of cherries before topping with more yogurt. This method not only looks appealing but also creates flavor pockets in each cube.
3. Tapping for Air Bubbles
After filling the molds, gently tap them on the countertop to eliminate any air bubbles. This step helps ensure that the yogurt mixture settles evenly and prevents large air pockets in your finished cubes.
Melting the Chocolate
Melting chocolate may seem straightforward, but there are best practices to ensure perfect results without burning or seizing.
1. Choose Your Chocolate
Select high-quality chocolate (dark, milk, or white) based on your preference. The chocolate should be free from any additives that could affect melting.
2. Use a Double Boiler
The safest method for melting chocolate is to use a double boiler. Fill a saucepan with a couple of inches of water and bring it to a simmer. Place a heatproof bowl on top, ensuring it doesn’t touch the water, and add your chocolate. Stir occasionally until it’s fully melted and smooth.
3. Microwave Method
If you prefer using a microwave, place chopped chocolate in a microwave-safe bowl. Heat in 20-second intervals, stirring in between, until melted. Be cautious not to overheat, as chocolate can easily burn.
4. Add a Fat
For a smoother consistency, consider adding a small amount of coconut oil or vegetable oil to the melted chocolate. This step helps to create a glossy finish and enhances the drizzling experience.
Drizzling the Chocolate
Once your chocolate is melted, it’s time to drizzle it over the frozen yogurt cubes for both flavor enhancement and visual appeal.
1. Use a Piping Bag
Transfer the melted chocolate into a piping bag or a zip-top bag with a corner snipped off. This makes it easy to control the flow of chocolate when drizzling.
2. Creative Patterns
Get creative with your drizzling technique—use zig-zag patterns, spirals, or even a crosshatch design. Drizzling different chocolate types (like dark and white) can create stunning contrasts.
3. Texture Additions
For added flavor and texture, consider sprinkling toppings on the chocolate drizzle while it’s still warm. Chopped nuts, shredded coconut, or even a sprinkle of sea salt can elevate the flavor profile and add visual interest.
Freezing the Cubes
Freezing is the final step in achieving the perfect Frozen Yogurt Chocolate Cherry Cubes.
1. Optimal Freezing Time
Place the filled molds in the freezer and allow them to freeze for at least 4-6 hours, or until completely solid. For best results, overnight freezing is recommended.
2. Proper Storage
Once fully frozen, carefully remove the cubes from the molds. Store them in an airtight container or a freezer bag to prevent freezer burn. Layer them with parchment paper to avoid sticking together.
3. Shelf Life
The cubes can be stored in the freezer for up to two months. However, for the best flavor and texture, enjoy them within the first month.
Nutritional Information
Understanding the nutritional value of your Frozen Yogurt Chocolate Cherry Cubes is essential, especially if you’re mindful of your diet.
Breakdown of Nutritional Value
Each serving (approximately two cubes) contains roughly:
– Calories: 120
– Total Fat: 5g
– Saturated Fat: 3g
– Cholesterol: 10mg
– Sodium: 30mg
– Total Carbohydrates: 18g
– Dietary Fiber: 1g
– Sugars: 10g
– Protein: 3g
Balanced Diet Consideration
These yogurt cubes are a guilt-free treat, offering a balance of protein from the yogurt and antioxidants from the cherries. They can fit well into a balanced diet, providing a sweet yet nutritious alternative to traditional desserts.
Dietary Modifications
If you have dietary restrictions, consider these modifications:
– Dairy-Free: Substitute regular yogurt with coconut or almond yogurt.
– Sugar-Free: Use a sugar substitute or unsweetened yogurt to reduce sugar content.
– Nut-Free: Ensure any toppings added are nut-free for those with allergies.
Serving Suggestions
Presenting your Frozen Yogurt Chocolate Cherry Cubes creatively can elevate your serving experience.
1. Perfect for Parties
Serve these cubes in small cups or on skewers for a fun party treat. They make excellent finger foods that are both delicious and visually appealing.
2. Garnishing Ideas
Enhance the visual appeal by garnishing with fresh mint leaves or edible flowers. A dusting of cocoa powder or a sprinkle of crushed nuts can add both flavor and texture.
3. Pairing Suggestions
These yogurt cubes pair wonderfully with fruit smoothies, iced coffee, or herbal teas. For a more indulgent experience, serve them alongside a drizzle of chocolate sauce or a scoop of ice cream.
Conclusion
Frozen Yogurt Chocolate Cherry Cubes are not just a delightful treat; they are a perfect blend of taste, health, and fun. This recipe is simple yet versatile, allowing you to experiment with various flavors and ingredients to make it your own. Whether you’re enjoying them as a refreshing snack, serving them at a gathering, or indulging in a guilt-free dessert, these cubes are sure to please.
We encourage you to explore different variations, such as adding other fruits or using flavored yogurts, to personalize your cubes. Enjoy these frozen delights as a wholesome treat, and share them with family and friends for a delightful experience everyone can appreciate!