
No-Bake S’mores Rice Krispie Bars: A Sweet Nostalgic Treat
S’mores have long held a cherished place in the hearts of many, evoking memories of campfires, summer nights, and the simple joy of roasting marshmallows to perfection. This classic treat, traditionally made with graham crackers, chocolate, and gooey marshmallows, has inspired countless variations over the years. One of the most delightful adaptations is the No-Bake S’mores Rice Krispie Bars, which combine the nostalgic flavors of s’mores with the crunchiness of Rice Krispies cereal. The best part? This recipe requires no oven, making it an incredibly convenient and easy dessert option for all ages.
The allure of a no-bake dessert lies in its simplicity. With just a few steps, you can create a delicious treat that’s perfect for parties, family gatherings, or even a quiet night in. No need to worry about baking times or temperature settings—just combine the ingredients, allow them to set, and enjoy. This no-bake s’mores rice Krispie bar recipe not only caters to those craving a sweet treat but also invites everyone to join in the fun of the kitchen without the hassle of complex cooking techniques.
Understanding the Ingredients
To craft the perfect No-Bake S’mores Rice Krispie Bars, it’s essential to understand the role each ingredient plays in creating this delectable dessert. Let’s break down the components that make these bars irresistible.
Rice Krispies Cereal
At the heart of our dessert lies the Rice Krispies cereal, which provides the essential texture and crunch that makes every bite enjoyable. This light and airy cereal is perfect for binding the ingredients together while adding that satisfying snap that contrasts beautifully with the gooey marshmallows.
Mini Marshmallows
No s’mores would be complete without the addition of mini marshmallows. These little puffs of sweetness not only contribute to the traditional flavor of s’mores but also add a chewy, gooey texture that enhances the overall experience of the bars. As the marshmallows melt and meld with the other ingredients, they create a luscious base for the bars.
Milk Chocolate Chips
Rich, creamy milk chocolate chips are another essential ingredient in our no-bake recipe. They provide the sweet, smooth chocolatey flavor that pairs perfectly with the marshmallows and cereal. The chocolate chips also help to bind the mixture together, adding indulgence in every bite.
Creamy Peanut Butter
Creamy peanut butter serves as a critical binding agent in this recipe, adding a depth of flavor that complements the sweetness of the marshmallows and chocolate. Its creamy consistency helps hold the bars together, ensuring they maintain their shape while also delivering a nutty richness that enhances the flavor profile.
Unsweetened Cocoa Powder
For those who appreciate a more complex chocolate taste, unsweetened cocoa powder is an excellent addition. It deepens the chocolate flavor without adding extra sweetness, balancing the overall flavor and ensuring that the bars are not overly sugary. This ingredient elevates the dessert, making it a delight for chocolate lovers.
Honey
Adding a natural sweetness, honey not only enhances the flavor but also contributes to the bars’ stickiness, allowing all the ingredients to mesh seamlessly. The subtle floral notes of honey complement the other flavors, ensuring that each bite is as delicious as the last.
Vanilla Extract
To further enrich the flavor profile, a splash of vanilla extract is included. This ingredient adds warmth and complexity, elevating the overall taste of the bars. The aromatic qualities of vanilla perfectly balance the sweetness of the marshmallows and chocolate.
Crushed Graham Crackers
To truly achieve that quintessential s’mores experience, crushed graham crackers are essential. They add a delightful crunch and are reminiscent of the classic graham cracker base in traditional s’mores. Their slightly sweet, toasty flavor ties the entire dessert together, making each bite a nostalgic reminder of campfire nights.
Additional Toppings (Optional)
One of the best aspects of this recipe is the ability to customize it to suit your taste. Additional toppings such as extra chocolate chips, crushed nuts, or drizzles of chocolate or caramel can be added for an extra layer of flavor and visual appeal. These toppings not only enhance the taste but also make the bars look more enticing, perfect for sharing at gatherings or parties.
Step-by-Step Instructions
Now that you have a solid understanding of the ingredients, let’s dive into the step-by-step instructions for making your own No-Bake S’mores Rice Krispie Bars. This process is straightforward and allows for plenty of creativity along the way.
1. Prepare Your Baking Dish: Start by lining an 8×8-inch baking dish with parchment paper or lightly greasing it. This will make it easier to remove the bars once they’ve set.
2. Melt the Peanut Butter and Honey: In a medium saucepan over low heat, combine the creamy peanut butter and honey. Stir continuously until the mixture is melted and smooth. This should take about 2-3 minutes. Be careful not to let it boil.
3. Add Cocoa Powder and Vanilla: Once the peanut butter and honey mixture is smooth, remove it from the heat. Stir in the unsweetened cocoa powder and vanilla extract until well combined. This step will give you a rich chocolatey base that will flavor the entire bar.
4. Incorporate Mini Marshmallows: Add the mini marshmallows to the warm mixture, stirring until they start to melt and combine with the chocolate mixture. The residual heat should be enough to soften them. If needed, you can return the pan to low heat for a minute, but be cautious not to overheat, as you want the marshmallows to remain fluffy.
5. Mix in Rice Krispies and Graham Crackers: Once the marshmallows are nicely blended in, remove the saucepan from the heat and fold in the Rice Krispies cereal and crushed graham crackers. Stir until everything is evenly coated with the marshmallow mixture.
6. Transfer to Baking Dish: Pour the mixture into the prepared baking dish. Using a spatula or your hands (lightly greased), press the mixture down firmly and evenly into the dish. Make sure it’s compact, as this will help the bars hold their shape once set.
7. Add Chocolate Chips: If you like, sprinkle additional chocolate chips on top of the mixture while it’s still warm, allowing them to slightly melt into the bars. This adds a delicious chocolate layer that enhances the visual appeal and flavor.
8. Let It Set: Allow the bars to cool at room temperature for about 30 minutes. For quicker results, you can place them in the refrigerator for about 15-20 minutes until they are firm enough to cut.
In this first part of the article, we’ve explored the nostalgic flavors that inspired the creation of No-Bake S’mores Rice Krispie Bars and detailed the ingredients that come together to create this delightful treat. The initial steps guide you through the process of melting, mixing, and pressing the ingredients into a baking dish, setting the stage for a delicious dessert that captures the essence of summer nights around the campfire. Stay tuned as we dive into the final steps and tips for serving these scrumptious bars in the following section.
{{image_2}}
Creating No-Bake S’mores Rice Krispie Bars is a delightful way to enjoy the classic flavors of s’mores without the hassle of a campfire. In this continuation, we’ll dive deeper into the recipe preparation, from melting the ingredients to serving your delicious creation. Let’s get started!
Preparing the Pan
Before embarking on the melting and mixing journey, preparing your pan is crucial. Using parchment paper is a game-changer; it prevents the bars from sticking and allows for easy removal once they’ve set. Cut a piece of parchment paper large enough to line the bottom and sides of an 8×8 or 9×9 inch baking dish, leaving some overhang. This overhang will act as handles, making it simple to lift out the bars later.
Additionally, a light spray of non-stick cooking spray on the parchment paper ensures that your bars come out seamlessly. This step is particularly important for a no-bake recipe where the texture relies heavily on achieving the right consistency without the added moisture from cooking.
Melting the Mixture
Achieving a smooth mixture is critical for the consistency of your No-Bake S’mores Rice Krispie Bars. Start by combining the butter, chocolate chips, and marshmallows in a medium saucepan over low heat. Stir continuously to ensure even melting and to prevent the chocolate from burning.
Patience is key here; melting over low heat allows the chocolate to incorporate smoothly without seizing. Once the mixture is fully melted and combined into a glossy consistency, you’ll know it’s ready for the next step. This smooth blend not only enhances flavor but also ensures that the bars hold together perfectly once set.
Incorporating the Marshmallows
When it comes to adding marshmallows, timing and technique are everything. As soon as your chocolate and butter mixture is smooth, remove it from the heat and gently fold in the mini marshmallows. This gentle incorporation allows the marshmallows to soften without fully melting.
The heat from the mixture will warm the marshmallows, making them gooey and sticky, creating that signature s’mores texture. For an even coat, use a spatula to fold the mixture together rather than stirring vigorously, which could break down the marshmallows too much. Keep an eye on the marshmallows; you want them soft but still intact to maintain that chewy texture in the finished bars.
Mixing with the Rice Krispies
Once your marshmallows are evenly coated, it’s time to add the Rice Krispies. Measure out the Rice Krispies into a large mixing bowl. Pour the melted chocolate and marshmallow mixture over the Rice Krispies and use a spatula to gently fold the cereal into the mixture.
This gentle folding is essential to maintaining the crunchiness of the Rice Krispies. If you mix too aggressively, you risk crushing the cereal, leading to a denser bar. Aim for an even coating where the Rice Krispies are fully enveloped in the marshmallow-chocolate mixture, but be careful not to overmix.
Pressing into the Pan
With your mixture well combined, it’s time to transfer it into the prepared pan. Use your spatula to spread the mixture evenly across the bottom of the pan. To achieve the right density, use your hands (lightly greased with non-stick spray) or the bottom of a measuring cup to press the mixture into the pan firmly but gently.
This pressing is important for ensuring your bars hold together when cut. If they’re too loosely packed, they may crumble apart. Aim for an even layer that is slightly compacted. Once you’ve achieved the desired shape and density, it’s time to move to the fun part: adding toppings!
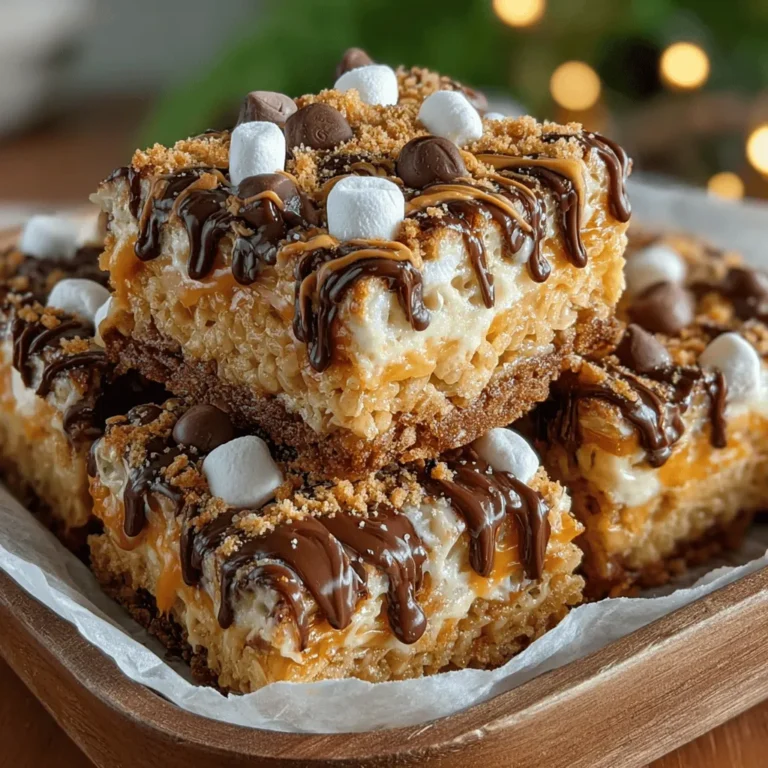
Adding Toppings
The beauty of No-Bake S’mores Rice Krispie Bars lies in their versatility. While the base is delicious on its own, you can elevate your bars with creative toppings. Here are some ideas:
– Mini Marshmallows: Sprinkle a handful of mini marshmallows on top before the mixture sets for an extra marshmallowy finish.
– Chocolate Drizzle: Melt some additional chocolate chips and drizzle it over the top for a decorative touch.
– Graham Cracker Crumbs: A sprinkle of crushed graham crackers adds texture and reinforces the s’mores theme.
– Chopped Nuts: For an added crunch, consider folding in chopped nuts like pecans or almonds.
– Sea Salt: A light sprinkle of sea salt on top can enhance the sweetness and provide a delightful flavor contrast.
Chilling & Setting
After adding your desired toppings, it’s time to let the bars chill. Place the pan in the refrigerator for at least 2 hours or until the mixture is firm. Chilling is essential for helping the bars set properly, which in turn affects their integrity and texture.
If you need to speed up the setting process, you can place the pan in the freezer for about 30 minutes. Just be cautious not to forget them in there, as freezing for too long can negatively impact texture.
Cutting & Serving
Once set, it’s time to cut your bars. To achieve clean cuts, use a sharp knife that has been lightly greased with non-stick spray. Cut the bars into squares or rectangles, depending on your preference. If you want to create uniform pieces, use a ruler as a guide.
For serving, consider presenting the bars on a wooden platter for rustic charm. You can garnish with extra graham cracker crumbs or a few chocolate chips for an appealing look. Additionally, consider pairing these treats with beverages like milk, hot cocoa, or even coffee for a delightful contrast.
Presentation Ideas
Creating an inviting dessert display can elevate your No-Bake S’mores Rice Krispie Bars. Here are some aesthetic tips:
– Garnishing: Use fresh mint leaves or edible flowers to add color and freshness to your presentation.
– Plating Options: Arrange the bars on a tiered stand for height or in small, clear cups for individual servings.
– Themed Decor: If serving at a gathering, consider a s’mores theme with decor elements like small campfires (using candles) or s’more-themed napkins.
Nutritional Information
Understanding the nutritional benefits of your ingredients can help you enjoy these treats mindfully. Here’s a brief breakdown of the key ingredients:
– Rice Krispies: Low in calories and provide a satisfying crunch. They offer carbohydrates for energy.
– Marshmallows: While high in sugar, they provide a chewy texture and are fat-free.
– Chocolate: Dark chocolate offers antioxidants and can enhance mood. Opt for high-quality chocolate for added health benefits.
– Butter: Provides richness and flavor; moderation is key given its fat content.
Portion Sizes
While these bars are incredibly tempting, it’s important to practice moderation. A portion size of one bar is typically sufficient for a sweet treat. Pairing them with fresh fruit or nuts can create a balanced snack option that satisfies your sweet tooth while providing additional nutrients.
Conclusion
No-Bake S’mores Rice Krispie Bars are not just a simple dessert; they embody the joy of cooking and sharing. With their ease of preparation, delightful flavors, and customizable options, these bars are perfect for various occasions—from parties and family gatherings to a quick treat after dinner.
The process of creating these bars is a wonderful opportunity to bond with loved ones, encouraging laughter and creativity in the kitchen. So gather your ingredients, invite some friends or family members, and enjoy the delightful experience of making and sharing these delicious treats. Happy cooking, and may your No-Bake S’mores Rice Krispie Bars bring joy and sweetness to your table!
