Indulgent Dreams Chocolate Peanut Butter Cups: A Decadent Delight
Introduction
Indulgent Dreams Chocolate Peanut Butter Cups are a heavenly combination of rich, semi-sweet chocolate and creamy peanut butter, making them an irresistible treat for chocolate lovers. These delightful confections are not only a staple in the world of sweets but also a nostalgic favorite for many. Whether you’re indulging in them after dinner, sharing them with friends, or enjoying a quiet moment of self-care, these homemade cups deliver a burst of flavor that is hard to resist.
Creating your own chocolate peanut butter cups at home allows you to control the ingredients, ensuring a healthier alternative while still satisfying your sweet tooth. You can tailor the sweetness, choose high-quality chocolate, and select your preferred type of peanut butter, making the experience not just about taste, but also about personal preference. In this article, we will explore the recipe in detail, discuss the essential ingredients, and guide you through the preparation process, ensuring that your homemade chocolate peanut butter cups turn out perfect every time.
Understanding the Ingredients
The success of the Indulgent Dreams Chocolate Peanut Butter Cups lies in the quality of the ingredients used. Let’s delve into each component that contributes to the overall flavor and texture of this indulgent treat.
*Semi-Sweet Chocolate Chips*
At the heart of these chocolate peanut butter cups is semi-sweet chocolate, known for its balanced flavor profile. The rich taste of semi-sweet chocolate strikes a perfect chord between sweetness and bitterness, allowing it to complement the creamy, nutty flavor of peanut butter beautifully. When melted, semi-sweet chocolate has a smooth and glossy texture, which is perfect for creating a sturdy shell that encases the luscious filling. Its melting characteristics make it an ideal choice for this recipe, as it hardens well once cooled, creating a satisfying snap when you bite into the cups.
*Creamy Peanut Butter*
The choice between creamy and chunky peanut butter can often stir up a healthy debate among peanut butter enthusiasts. For this recipe, creamy peanut butter is recommended, as it creates a smooth and velvety filling that blends seamlessly with the chocolate. The silky texture of creamy peanut butter not only enhances the overall mouthfeel but also allows for easier filling of the chocolate cups. If you prefer a bit of crunch, however, you can certainly opt for chunky peanut butter, but keep in mind that it may alter the texture of the final product.
*Powdered Sugar*
Powdered sugar plays a crucial role in achieving the perfect sweetness and texture for the peanut butter filling. Unlike granulated sugar, which can create a grainy texture, powdered sugar dissolves quickly and blends effortlessly into the creamy peanut butter. This ensures that your filling is not only sweet but also smooth and easy to scoop into the chocolate shells. Additionally, it helps to stabilize the peanut butter, allowing it to hold its shape when bitten into.
*Vanilla Extract and Salt*
While chocolate and peanut butter are the stars of the show, the addition of vanilla extract and a pinch of salt elevates the overall flavor profile of the cups. Vanilla extract adds a warm, aromatic note that enhances the sweetness, making the filling even more irresistible. On the other hand, a touch of salt balances the sweetness and brings out the natural flavors of the chocolate and peanut butter, creating a harmonious blend that keeps you coming back for more.
*Milk Chocolate Chips (Optional)*
For those who want to add an extra layer of decadence, a drizzle of milk chocolate chips is a delightful optional addition. This not only enhances the visual appeal of the cups but also provides a contrasting taste that complements the semi-sweet chocolate base. The creamy sweetness of milk chocolate can provide an additional depth of flavor, making each bite even more indulgent.
*Mini Cupcake Liners*
Using mini cupcake liners is essential for the successful preparation of your chocolate peanut butter cups. These liners not only help in shaping the cups but also make for easy serving and presentation. By ensuring that the chocolate and peanut butter filling is contained within the liner, you minimize the risk of messy cleanup and enhance the overall experience of enjoying your homemade treats. Opting for colorful or decorative liners can also add a festive touch, making them perfect for parties or special occasions.
Step-by-Step Preparation Guide
Now that we’ve explored the ingredients, it’s time to dive into the step-by-step preparation guide for making your Indulgent Dreams Chocolate Peanut Butter Cups. This comprehensive guide will ensure clarity and confidence in the cooking process.
*Preparing the Mold*
1. Gather your materials: Begin by gathering your mini cupcake pan and mini cupcake liners. It’s essential to choose liners that fit snugly into the mold to prevent any leaks during the filling process.
2. Line the mini cupcake pan: Carefully place a mini cupcake liner into each cavity of the pan. Make sure the liner is pressed firmly against the sides and bottom, ensuring it holds its shape. A snug fit is crucial to avoid any gaps where chocolate could seep out, which would lead to a messy result.
3. Set up your workspace: Prepare your workspace by clearing a flat surface where you can melt the chocolate and assemble your cups. Having all your ingredients and tools within reach will make the process smoother and more enjoyable.
By following these initial steps, you’re setting the stage for a successful and delightful chocolate peanut butter cup-making experience. In the subsequent sections, we will cover the melting of the chocolate, the preparation of the peanut butter filling, and the final assembly of these decadent treats, ensuring that each step is easy to follow and results in delicious homemade chocolate peanut butter cups. Stay tuned for the next part of this indulgent journey!
{{image_2}}
Melting the Chocolate
To achieve the perfect melted chocolate for your Indulgent Dreams Chocolate Peanut Butter Cups, start by selecting high-quality chocolate. For a luscious flavor, opt for semi-sweet or dark chocolate. The melting process is critical, and there are two primary methods you can use: the microwave or the stovetop.
Microwave Method
1. Chop the Chocolate: Begin by chopping your chocolate into small, uniform pieces. This ensures even melting.
2. Heat in Intervals: Place the chopped chocolate in a microwave-safe bowl. Microwave on medium power for 30 seconds at a time, stirring after each interval. This prevents scorching and helps you control the melting process.
3. Final Stir: Once the chocolate is nearly melted (with some small pieces remaining), remove it from the microwave and stir continuously until fully melted and smooth. This residual heat will help melt the remaining chocolate.
Stovetop Method
1. Double Boiler Setup: Fill a saucepan with a few inches of water and bring it to a simmer. Place a heatproof bowl on top, ensuring it doesn’t touch the water.
2. Add Chocolate: Add the chopped chocolate to the bowl and stir as it begins to melt. Be attentive to avoid any water from splashing into the chocolate, which can cause it to seize.
3. Consistent Stirring: Keep stirring until the chocolate is fully melted, smooth, and glossy.
By using these techniques, you can achieve a perfect melted chocolate base for your cups, ensuring a rich flavor and smooth texture.
Coating the Liners
Once your chocolate is melted, it’s time to coat the liners. This step is crucial for achieving the best results.
1. Prepare Your Liners: Place cupcake liners in a muffin tin. This will provide stability and shape for your chocolate cups.
2. First Coat: Using a spoon or a pastry brush, coat the bottom and sides of each liner with a generous layer of melted chocolate. Make sure to spread it evenly to avoid any weak spots. A thicker layer will give you a sturdier cup.
3. Chill to Set: Place the coated liners in the freezer for about 10-15 minutes until the chocolate is firm to the touch. This initial layer acts as a shell for your peanut butter filling.
Making the Peanut Butter Filling
Now it’s time to create the delicious peanut butter filling that will elevate your chocolate cups.
1. Combine Ingredients: In a medium bowl, mix together 1 cup of creamy peanut butter, 1/4 cup of powdered sugar, and a pinch of salt. The powdered sugar not only sweetens the mixture but also helps to stabilize it.
2. Blend for Smoothness: Use a hand mixer or whisk to blend the ingredients until you achieve a smooth and well-combined texture. This step is vital; the filling should be creamy yet firm enough to hold its shape when placed in the chocolate cups.
3. Taste and Adjust: Feel free to taste your filling and adjust the sweetness as desired. If you prefer a sweeter filling, add more powdered sugar gradually.
Filling and Topping the Cups
With your chocolate liners and peanut butter filling ready, it’s time to assemble the cups.
1. Fill the Cups: Remove the chocolate-coated liners from the freezer. Spoon a generous amount of the peanut butter filling into each cup, making sure to leave some space at the top for the final chocolate layer.
2. Top with Chocolate: Using the remaining melted chocolate, carefully spoon or pour it over the peanut butter filling, covering it completely. Use the back of a spoon to spread it evenly and seal the filling within the chocolate shell.
3. Smooth the Surface: Gently tap the muffin tin on the counter to settle the filling and smooth the top layer of chocolate.
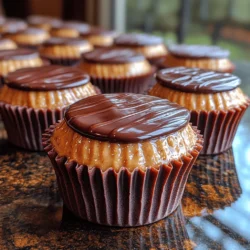
Drizzling for Presentation
To add an elegant touch to your chocolate peanut butter cups, consider creating a drizzle with melted chocolate.
1. Melt Additional Chocolate: Use some extra chocolate chips to create a drizzle. Melt them using the same method as before.
2. Drizzle Technique: Once melted, transfer the chocolate to a small piping bag or a Ziploc bag with the corner snipped off. Drizzle the chocolate over the tops of the cups in a decorative pattern for a professional look.
Chilling and Setting
Now it’s time to let your creations set properly.
1. Chill in the Refrigerator: Place the assembled cups back into the freezer for an additional 20-30 minutes, or until the chocolate is fully set and firm.
2. Check for Firmness: To ensure they are ready, gently press the tops; they should feel firm and not soft to the touch.
Serving Suggestions
Your Indulgent Dreams Chocolate Peanut Butter Cups are now ready to be served! Here are some delightful serving suggestions:
1. Presentation: Arrange the cups on a decorative plate or in a tiered dessert stand for an eye-catching display.
2. Pairing with Beverages: These treats pair wonderfully with a glass of cold milk or a warm cup of coffee, enhancing the flavors of chocolate and peanut butter.
3. Gifting Idea: For a thoughtful gift, place the cups in a decorative box or jar, tying it with a ribbon for a personalized touch.
Nutritional Information
Understanding the nutritional content of your homemade indulgence is essential, especially when compared to store-bought options.
– Calories: Each chocolate peanut butter cup contains approximately 150-200 calories, depending on the size and ingredients used.
– Benefits of Homemade: By making these cups at home, you can control the ingredients, ensuring no preservatives or artificial additives are included. Homemade treats often contain healthier fats from nut butter and can be customized for sweetness.
Storage Tips
To maintain the freshness and flavor of your chocolate peanut butter cups, follow these storage tips:
1. Cool Completely: Allow the cups to cool and set completely before storing.
2. Airtight Container: Store the cups in an airtight container to preserve their texture and flavor. They can be kept at room temperature for up to a week or in the refrigerator for longer freshness.
3. Freezing for Later: For extended storage, these cups freeze beautifully. Place them in a single layer on a baking sheet, freeze until solid, and then transfer them to a freezer-safe container. They can last up to 3 months in the freezer.
Variations and Customizations
There are numerous ways to customize your chocolate peanut butter cups to cater to different tastes or dietary needs:
1. Dark Chocolate: Substitute dark chocolate for a richer, less sweet flavor.
2. Nut Alternatives: Use almond butter, cashew butter, or sunflower seed butter for a unique twist or to accommodate nut allergies.
3. Vegan Option: For a vegan version, use dairy-free chocolate and a plant-based nut butter. Ensure that all other ingredients, such as powdered sugar, are vegan-friendly.
4. Add-ins: Enhance the filling with crushed nuts, shredded coconut, or even a hint of spice like cinnamon for a flavor boost.
Conclusion
Indulgent Dreams Chocolate Peanut Butter Cups are more than just a dessert; they embody the joy of creating something delicious from scratch. By following this detailed recipe, you can craft a crowd-pleasing treat that not only satisfies sweet cravings but also warms the hearts of those who enjoy them. Embrace the process of making these delectable cups, and take delight in every rich, creamy bite of your homemade indulgence. Treat yourself and your loved ones to this delightful experience, and watch as smiles light up the room!