
Frozen Yogurt Chocolate Mint Swirl Pops: A Refreshing Homemade Delight
In recent years, frozen yogurt pops have surged in popularity as a delightful, healthier alternative to traditional ice cream. These frozen treats are not just for children; they have captured the hearts and taste buds of all ages, making them a staple in many households during the warmer months. Among the myriad of flavors that can be explored in the world of frozen yogurt pops, the combination of chocolate and mint stands out as a classic favorite. The Frozen Yogurt Chocolate Mint Swirl Pops not only bring together the refreshing taste of mint with the rich flavor of chocolate, but they also offer a guilt-free indulgence that can be enjoyed without the added preservatives and artificial ingredients often found in store-bought options.
One of the standout features of these pops is their base ingredient: Greek yogurt. Known for its creamy texture and tangy flavor, Greek yogurt serves as the perfect foundation for these pops, contributing to their nutritional profile while ensuring a satisfying mouthfeel. By making these pops at home, you have complete control over the ingredients, allowing for a healthier treat that doesn’t compromise on taste.
Health Benefits of Greek Yogurt
Greek yogurt is not just delicious; it’s also packed with nutritional benefits that make it an excellent addition to any diet. One of the most significant advantages of Greek yogurt is its high protein content. Compared to regular yogurt, Greek yogurt has been strained to remove whey, resulting in a thicker consistency and a higher concentration of protein. This protein boost can help keep you feeling full longer, making it a perfect snack option, especially during the hot summer months when cravings for something refreshing might strike.
Moreover, Greek yogurt is rich in probiotics, which are beneficial bacteria that support gut health. Incorporating probiotics into your diet can promote a balanced digestive system and may even enhance your immune response. This makes Greek yogurt a smart choice not only for those looking to enjoy a tasty treat but also for anyone focused on maintaining a healthy lifestyle.
When it comes to sweeteners, this recipe offers flexibility, allowing you to choose between honey and maple syrup. Both natural sweeteners have their own unique benefits and flavors. Honey is known for its antibacterial properties and is often touted for its ability to soothe sore throats and improve digestion. On the other hand, maple syrup is packed with antioxidants and has a lower glycemic index than refined sugar, making it a suitable choice for those mindful of their blood sugar levels. Choosing natural sweeteners over processed sugars is a smart way to enhance the health profile of your treats without compromising on flavor.
The flavor profile of the Frozen Yogurt Chocolate Mint Swirl Pops is further enriched by the addition of unsweetened cocoa powder and peppermint extract. Cocoa powder is not only a source of rich chocolate flavor but also contains antioxidants that can benefit heart health. Peppermint extract adds a refreshing zing that balances the richness of the chocolate, creating a harmonious blend that is both delicious and invigorating.
Creating the Mint Yogurt Layer
Now that we’ve explored the background and health benefits of the ingredients, let’s dive into the first steps of creating the Frozen Yogurt Chocolate Mint Swirl Pops, starting with the mint yogurt layer. This layer is the star of the show, bringing in that delightful minty freshness that pairs beautifully with the chocolate.
Step 1: Gather Your Ingredients
To prepare the mint yogurt layer, you will need the following ingredients:
– 2 cups plain Greek yogurt
– 1/4 cup honey or maple syrup (adjust according to personal taste)
– 1 teaspoon peppermint extract
– Optional: a few drops of green food coloring for visual appeal
Step 2: Mix the Ingredients
In a medium-sized mixing bowl, combine the plain Greek yogurt, your chosen sweetener, and peppermint extract. Using a spatula or whisk, blend the ingredients until they are thoroughly mixed and smooth. The plain Greek yogurt serves as a perfect canvas, allowing the flavors of the mint and sweetener to shine through.
Step 3: Adjust the Sweetness
Taste the mixture and adjust the sweetness to your preference. If you prefer a sweeter pop, feel free to add a little more honey or maple syrup. Remember, the sweetness will mellow out slightly when frozen, so it’s okay for the mixture to be a bit sweeter than you might expect.
Step 4: Add Color (Optional)
If you want to make your pops visually appealing, consider adding a few drops of green food coloring to the mint yogurt mixture. This step is entirely optional, but it can add a festive touch, especially if you’re preparing these treats for a party or gathering. Stir the mixture until the color is evenly distributed, creating a vibrant mint layer.
Crafting the Chocolate Layer
With the mint yogurt layer ready, it’s time to create the rich chocolate layer that will complement the refreshing mint. This layer is just as simple to prepare and adds a delightful contrast to the minty goodness.
Step 1: Gather Your Ingredients
For the chocolate layer, you will need:
– 2 cups plain Greek yogurt
– 1/4 cup unsweetened cocoa powder
– 1/4 cup honey or maple syrup (or to taste)
– 1 teaspoon vanilla extract
Step 2: Mix the Ingredients
In another mixing bowl, combine the plain Greek yogurt, unsweetened cocoa powder, your chosen sweetener, and vanilla extract. Whisk the ingredients together until they form a smooth, creamy mixture. The unsweetened cocoa powder provides a deep chocolate flavor without the added sugars found in many commercial chocolate products.
Step 3: Adjust the Sweetness
Just like with the mint layer, taste the chocolate mixture and adjust the sweetness as needed. The balance of flavors is essential, so ensure that the chocolate layer complements the mint layer rather than overpowering it.
Step 4: Prepare for Layering
Now that both layers are ready, it’s time to assemble your Frozen Yogurt Chocolate Mint Swirl Pops. This is where the fun begins!
With the introduction complete, you can look forward to the next steps where we will explore how to layer the mint and chocolate mixtures, fill the molds, and freeze these delightful pops for your enjoyment. These pops are sure to become a favorite, offering a refreshing and healthier alternative to store-bought frozen treats. Stay tuned as we delve deeper into the crafting process!
{{image_2}}
Creating homemade frozen treats can be a delightful way to beat the heat while satisfying your sweet tooth. One such treat that perfectly balances indulgence and health is the Frozen Yogurt Chocolate Mint Swirl Pops. In this section, we will delve deeper into the intricacies of making these delicious pops, focusing on maximizing flavor, achieving a delightful texture, and ensuring a visually appealing presentation. So, let’s get started!
The Role of Vanilla Extract in Enhancing Taste
Vanilla extract is a powerful ingredient that elevates the flavors of your Frozen Yogurt Chocolate Mint Swirl Pops. It plays a pivotal role in enhancing the overall taste profile, adding warmth and depth to the mint and chocolate mixtures. When you incorporate vanilla extract into your yogurt base, it complements the creaminess of the yogurt while softening the sharpness of the mint. This balance creates a more sophisticated flavor that makes each bite truly enjoyable.
Choosing a high-quality vanilla extract is crucial. Pure vanilla extract, made from real vanilla beans, offers a richness that imitation varieties simply cannot match. For a subtle twist, consider experimenting with flavored extracts, such as almond or peppermint, which can add an interesting dimension to your pops.
Achieving a Creamy Texture and Avoiding Lumps
To achieve a smooth and creamy texture in your Frozen Yogurt Chocolate Mint Swirl Pops, it is essential to blend the yogurt mixture thoroughly. Start by using a high-speed blender or food processor to combine the yogurt, sweetener, and vanilla extract until the mixture is homogenous. If you notice any lumps, blend a little longer to ensure everything is well incorporated.
Additionally, when mixing the chocolate and mint layers, it’s important to melt the chocolate until it is completely smooth. Use a double boiler or microwave in short bursts, stirring frequently to prevent burning. Once melted, allow it to cool slightly before folding it into the yogurt mixture to maintain that creamy texture.
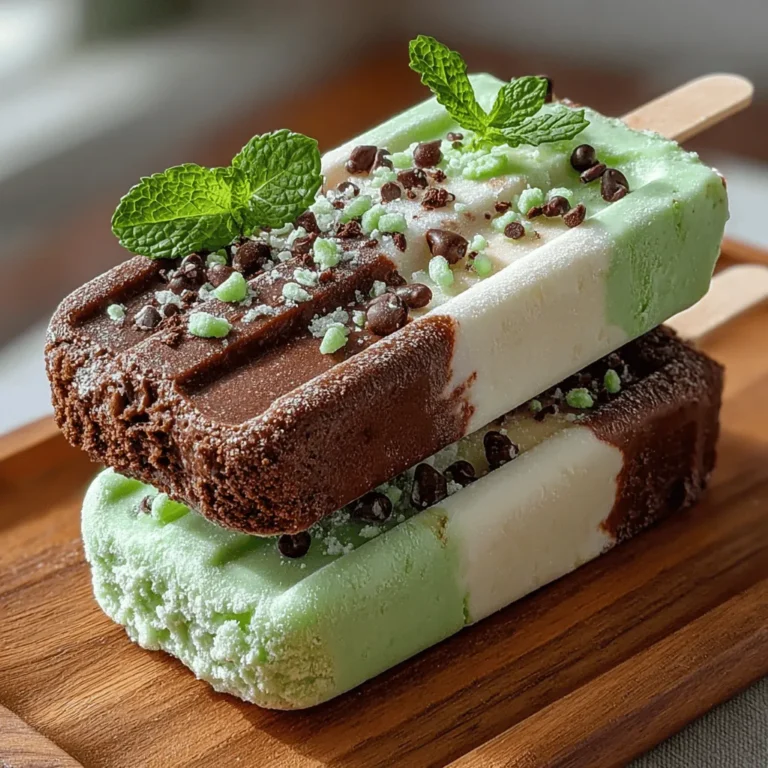
Layering Techniques for Visual Appeal
Tips for Effectively Layering the Mint and Chocolate Mixtures in Molds
Layering your mint and chocolate mixtures effectively not only enhances the visual appeal of your pops but also creates a delightful contrast in flavors with every bite. Begin by spooning a layer of the mint yogurt mixture into your molds, filling them about one-third full. Use a spatula or the back of a spoon to smooth it out evenly.
Next, gently pour a layer of the chocolate mixture on top of the mint layer. To avoid mixing the two layers, pour slowly and allow the chocolate to settle naturally atop the mint. Repeat this process until the molds are filled, finishing with a layer of chocolate for a beautiful top.
Importance of Filling Molds Evenly for a Balanced Pop
Even filling is crucial for balanced pops. If the layers are uneven, some pops may be overly minty while others are too chocolatey. Take your time to ensure each layer is filled to the same height in every mold. This attention to detail will not only enhance the flavor balance but also ensure that each pop has a consistent texture.
Techniques for Creating a Marbled Effect
If you want to add an artistic touch, consider creating a marbled effect. After filling the molds with the mint and chocolate layers, take a skewer or toothpick and gently swirl it through the layers. This technique will create beautiful swirls that give each pop a unique look while still maintaining distinct flavors.
Suggestions for Using Tools Like Skewers or Toothpicks
Using skewers or toothpicks can be an excellent way to achieve precision in your layering. They can help you control the amount of swirling you do, ensuring you don’t over-mix the layers. Moreover, these tools are handy for checking the layers’ consistency, allowing you to adjust as necessary before the mixture sets.
Freezing and Unmolding Your Pops
Best Practices for Freezing Times and Ensuring Pops Set Solidly
Once your molds are filled, it’s time to freeze them. For the best results, place the molds in the freezer for a minimum of 4-6 hours, or until they are completely solid. To ensure even freezing, avoid placing them too close to the freezer walls or on top of one another. It’s a good idea to check the pops after a few hours; if they are still soft, allow them to freeze longer.
Explanation of How Temperature Affects the Texture of Frozen Treats
The temperature at which you freeze your pops significantly affects their texture. If frozen too quickly, the pops may develop ice crystals, leading to a grainy texture. Conversely, freezing at a consistent, low temperature allows the ingredients to meld beautifully, resulting in a creamy, smooth treat. Avoid opening the freezer door frequently during the freezing process, as this can cause temperature fluctuations that may impact the final texture.
Methods for Easy Unmolding and Presentation
Once your pops are fully frozen, it’s time to unmold them. To do this easily, run warm water over the outside of the molds for a few seconds. This gentle heat will help release the pops without damaging them. Be careful not to let the warm water touch the pops themselves, as this can cause melting.
For presentation, consider placing the unmolded pops onto a decorative platter. A colorful plate can enhance the visual appeal and create an inviting atmosphere for serving.
Using Warm Water to Release Pops Without Breaking
If you encounter resistance when trying to remove the pops from the molds, don’t force them out, as this may lead to breakage. Instead, submerge the molds in warm water for about 10-15 seconds, allowing the heat to work its magic. This method is effective and helps maintain the integrity of your beautifully crafted pops.
Garnishing for Extra Flavor and Texture
Ideas for Toppings: Mini Chocolate Chips and Crushed Mint Candies
To elevate your Frozen Yogurt Chocolate Mint Swirl Pops even further, consider garnishing them with toppings that add both flavor and texture. Mini chocolate chips are a great option, providing a delightful crunch that complements the creamy yogurt. Crushed mint candies can also add a refreshing burst of flavor while enhancing the visual appeal with their vibrant color.
The Impact of Garnishes on Flavor and Visual Presentation
Garnishes are not just for looks; they play a significant role in enhancing the overall flavor experience. A sprinkle of crushed candies or chips can create a delightful contrast to the smooth yogurt base, making each bite more exciting. Additionally, visually appealing garnishes can make your frozen pops more enticing, especially when serving at gatherings or parties.
Serving Suggestions to Enhance the Experience
When serving your Frozen Yogurt Chocolate Mint Swirl Pops, consider pairing them with fresh fruit, such as strawberries or raspberries, for a refreshing contrast. You can also serve them alongside a drizzle of chocolate or a dollop of whipped cream for an indulgent twist. Presenting your pops on a beautifully arranged platter can make them the star of any dessert table.
Using Decorative Platters and Fresh Mint for Aesthetic Appeal
Presentation is key when it comes to food, and your pops deserve to be showcased. Use decorative platters or tiered stands to create an eye-catching display. Adding a few sprigs of fresh mint around the platter not only enhances the aesthetic but also reinforces the minty theme of the pops.
Conclusion
In summary, making Frozen Yogurt Chocolate Mint Swirl Pops at home is a delightful experience that combines creativity with indulgence. With the right techniques, you can create a treat that is not only pleasing to the eyes but also satisfying to the palate. The combination of creamy yogurt, rich chocolate, and refreshing mint creates a perfect balance of flavors that everyone will love.
Don’t hesitate to experiment with flavors and customize your ingredients! Try adding different extracts, fruits, or even a swirl of fruit puree to create your unique version of these pops. The joy of making these treats lies in the ability to personalize them to your taste, allowing you to indulge without the guilt. So gather your ingredients, follow these tips, and enjoy the process of creating your Frozen Yogurt Chocolate Mint Swirl Pops!
