Crispy Oven-Baked Fish Tacos: A Delicious and Healthier Twist on a Classic Favorite
Fish tacos have surged in popularity in recent years, becoming a staple in many contemporary kitchens and restaurants. Their vibrant flavors, fresh ingredients, and versatility make them a beloved choice for both casual meals and more sophisticated dining experiences. Traditionally, fish tacos are often deep-fried, which can add unnecessary calories and unhealthy fats. However, the crispy oven-baked fish taco variant offers a healthier alternative that does not compromise on taste or texture. With this recipe, you can enjoy the crunch and flavor of fried fish while keeping your meal light and nutritious.
One of the most appealing aspects of crispy oven-baked fish tacos is their simplicity and quick preparation time. In less than 30 minutes, you can have a delicious meal ready to serve, making them perfect for busy weeknight dinners or casual gatherings with friends and family. The combination of crispy fish, fresh toppings, and zesty dressing creates a delightful culinary experience that will please even the most discerning palates.
Understanding the Ingredients
To achieve the ultimate crispy oven-baked fish tacos, it’s essential to understand the key ingredients that come together to create this dish. The primary components include fresh fish fillets, panko breadcrumbs, tortillas, and a variety of toppings and dressings that enhance the overall flavor profile.
Choosing the Right Fish
The choice of fish plays a significant role in determining the flavor and texture of your tacos. Popular options include white fish varieties such as cod, tilapia, or halibut, all of which have a mild flavor and firm texture that holds up well during baking. When selecting fish, look for fillets that are fresh, firm, and have a clean smell. If possible, opt for sustainably sourced fish to support responsible fishing practices and enjoy the best quality.
The Role of Panko Breadcrumbs
Panko breadcrumbs are a game-changer when it comes to achieving that coveted crispy exterior without frying. Unlike traditional breadcrumbs, panko is made from white bread without crusts, resulting in larger, airier flakes that create a light and crunchy texture when baked. The use of panko not only enhances the crispiness of the fish but also allows it to stay tender and moist on the inside. This contrast is essential for an enjoyable eating experience.
Enhancing with Toppings and Dressings
The toppings and dressings you choose can elevate your crispy oven-baked fish tacos to new heights. Fresh ingredients such as shredded cabbage, diced tomatoes, avocado slices, and cilantro add a burst of flavor and color to each bite. For the dressing, a simple combination of lime juice, yogurt or sour cream, and spices can create a tangy and creamy sauce that complements the fish perfectly. The balance of flavors and textures from the toppings and dressing is what makes these tacos truly unforgettable.
Preparing the Fish
To prepare the fish for your tacos, start by selecting and prepping the fillets. Here’s a detailed guide to ensure your fish is ready for the oven and results in perfectly crispy tacos.
Selecting Fresh Fish Fillets
When you’re at the market, choose fillets that are bright in color with no browning around the edges. If you’re unsure of how to select fresh fish, ask your fishmonger for recommendations based on what’s available. Once you have your fillets, gently rinse them under cold water and pat them dry with paper towels to remove any excess moisture. This step is crucial, as moisture can prevent the fish from achieving that desirable crispiness.
Drying the Fish
After rinsing and patting dry, it’s essential to dry the fillets thoroughly. You can place them on a wire rack set over a baking sheet for about 15-20 minutes. This drying process helps to remove surface moisture, which is key to achieving a crispy exterior when baking. Additionally, if you have time, you can refrigerate the fish uncovered for about an hour to help further dry out the surface.
Cutting into Even Strips
Once the fish is adequately dried, it’s time to cut it into strips. Aim for uniform pieces, about 1 inch wide, to ensure even cooking. Using a sharp knife, cut against the grain of the fish to maintain a tender texture. Uneven pieces can lead to some strips cooking faster than others, which could result in a less-than-perfect taco experience.
Creating the Breading Station
A well-organized breading station is essential for achieving a perfect coating on your fish. This process typically involves three key ingredients: flour, egg, and panko breadcrumbs. Setting up your station properly can streamline the breading process and ensure your fish is evenly coated.
The Three-Step Breading Process
1. Flour: Start by placing all-purpose flour in a shallow dish. This will act as the first layer of your coating and helps the egg adhere to the fish. Season the flour with a pinch of salt and pepper to enhance the flavor.
2. Egg Wash: In a second shallow dish, whisk together eggs until well combined. The egg wash serves as the adhesive for the panko breadcrumbs, helping to create that crispy outer layer.
3. Panko Breadcrumbs: Finally, place panko breadcrumbs in a third shallow dish. For added flavor, you can mix in some spices, such as garlic powder, paprika, or cayenne pepper, to give your fish an extra kick.
Ensuring Proper Coating Adherence
To ensure the coating adheres properly, follow this sequence: first, dredge each fish strip in the flour, shaking off any excess. Next, dip the floured fish into the egg wash, allowing any excess egg to drip off before moving on to the panko. Gently press the fish into the panko to ensure an even coating, making sure to cover all sides. Once coated, place the fish strips on a wire rack or a lined baking sheet until ready to bake. This will help keep the coating intact and prevent sogginess.
Baking the Fish for Optimal Crispiness
Once your fish is breaded and ready to go, it’s time to bake and achieve that perfect crispy texture. Proper oven settings and arrangements can make all the difference in the outcome of your dish.
Setting the Oven Temperature
Preheat your oven to 425°F (220°C). This high temperature is crucial for achieving a crispy exterior while cooking the fish through without drying it out. For even better results, consider using a convection setting, if available, as it promotes even heat distribution and enhances crispiness.
Preparing the Baking Sheet
Line a baking sheet with parchment paper or a silicone baking mat to prevent sticking. This will also aid in easy cleanup after cooking. Lightly spray the lined baking surface with cooking oil to promote browning on the fish.
Arranging the Fish Strips
When placing the breaded fish strips on the baking sheet, ensure they are spaced out evenly. Avoid overcrowding, as this can trap steam and lead to soggy fish. If necessary, use two baking sheets to allow for proper air circulation.
Monitoring Cooking Time
Bake the fish in the preheated oven for about 12-15 minutes, or until the coating is golden brown and the fish is cooked through. To ensure even cooking, flip the fish strips halfway through the baking time. Keep a close eye on them toward the end of the cooking time, as the panko can burn quickly if left unattended.
With these initial steps, you’re well on your way to creating a delicious batch of crispy oven-baked fish tacos. The combination of fresh ingredients, a well-prepared fish fillet, and a careful baking process will lead to a dish that’s not only healthier but also incredibly satisfying. Stay tuned for the next part, where we’ll delve into crafting the perfect dressing and assembling your tacos for a delightful meal.
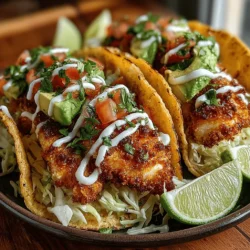
{{image_2}}
Step-by-Step Guide to Making the Greek Yogurt Dressing
To elevate your crispy oven-baked fish tacos, the Greek yogurt dressing is essential. Its creamy, tangy profile complements the fish beautifully. Here’s how to make it:
1. Gather Ingredients: For the dressing, you’ll need:
– 1 cup of Greek yogurt
– 2 tablespoons of lime juice (freshly squeezed for best flavor)
– 1 tablespoon of honey (adjust based on your sweetness preference)
– 1 teaspoon of garlic powder
– Salt and pepper to taste
2. Mix the Base: In a medium bowl, add the Greek yogurt. This will serve as the base for your dressing, providing creaminess and a rich texture.
3. Add Flavorings: Pour in the lime juice and honey. Use a whisk to combine these ingredients thoroughly. The acidity from the lime juice balances the richness of the yogurt, while the honey adds a hint of sweetness.
4. Season: Sprinkle in the garlic powder, along with a pinch of salt and pepper. Taste the dressing and adjust the seasoning as needed. If you prefer a more intense flavor profile, consider adding a little more lime juice or even some chopped fresh herbs like cilantro or dill.
5. Chill: Cover the dressing with plastic wrap and refrigerate it for at least 30 minutes. This allows the flavors to meld and develop, enhancing the overall taste of your tacos.
Flavor Balance with Lime Juice, Honey, and Garlic Powder
The key to a successful dressing is balance. The tanginess of lime juice cuts through the richness of the Greek yogurt, while the honey adds a subtle sweetness that counteracts any bitterness. Garlic powder infuses the dressing with a savory depth that ties all the flavors together. Adjusting these elements according to your personal taste can transform the dressing into your signature blend.
Suggestions for Customizing the Dressing
Feel free to customize your Greek yogurt dressing to suit your palate. Here are a few ideas:
– Herb Infusion: Add fresh herbs such as cilantro, dill, or parsley for an aromatic twist.
– Spicy Kick: Incorporate a pinch of cayenne pepper or a dash of hot sauce for some heat.
– Creamier Texture: For an even creamier dressing, mix in some avocado or a bit of mayonnaise.
– Zesty Flavor: Substitute lemon juice for lime for a different citrus profile.
Warming and Preparing the Tortillas
The choice of tortilla can significantly affect the final taste and texture of your fish tacos. Here’s how to warm them properly and select the best type.
Methods for Warming Tortillas
1. Stovetop: Heat a non-stick skillet over medium heat. Add the tortillas one at a time, warming them for about 30 seconds on each side until they are pliable and fragrant.
2. Oven: Preheat your oven to 350°F (175°C). Wrap a stack of tortillas in aluminum foil and place them in the oven for about 10-15 minutes.
3. Microwave: Place a damp paper towel over a stack of tortillas and microwave them for about 30 seconds. This method is quick but may not provide the same flavor depth.
Corn vs. Flour Tortillas
When it comes to selecting tortillas, both corn and flour have their unique profiles:
– Corn Tortillas: These are traditional for fish tacos, offering a slightly nutty flavor and a firmer texture that holds up well to fillings.
– Flour Tortillas: These are softer and more pliable, with a mild flavor. They are excellent for wrapping but may not provide the same authentic experience as corn tortillas.
Whichever type you choose, make sure they are warmed properly to enhance flavor and prevent tearing.
Tips for Ensuring Tortillas are Pliable and Fragrant
– Always store your tortillas in an airtight container to prevent them from drying out.
– Use a little oil or butter on the skillet when warming corn tortillas to add flavor and prevent sticking.
– If you notice your tortillas are too dry, consider adding a splash of water to the skillet while covering them with a lid for a few seconds to create steam.
Assembling the Tacos
Now that your fish is crispy, your dressing is ready, and your tortillas are warmed, it’s time to assemble your tacos.
Step-by-Step Instructions for Layering Ingredients
1. Start with Tortillas: Place a warm tortilla on a plate.
2. Add Fish: Layer 2-3 pieces of crispy baked fish in the center.
3. Top with Cabbage: Add a generous handful of shredded cabbage. This adds crunch and freshness.
4. Tomatoes and Avocado: Scatter diced tomatoes and sliced avocado over the cabbage, adding color and creaminess.
5. Drizzle the Dressing: Finally, drizzle your Greek yogurt dressing over the top for that creamy finish.
Balancing Flavors
The balance of textures and flavors is crucial for a satisfying taco. The crunch of cabbage contrasts beautifully with the tender fish, while the creaminess of avocado and dressing rounds out the experience. Feel free to experiment with the ratios to find your perfect blend.
Presentation and Serving Suggestions
Presentation plays a significant role in the enjoyment of food. Here are some tips to make your tacos visually appealing.
Tips for an Attractive Presentation
– Use a colorful plate to make the ingredients pop.
– Arrange tacos in a row for a neat display or stack them for a more casual look.
– Consider serving tacos in a taco holder for added flair.
Suggestions for Garnishing
– Cilantro: Fresh cilantro adds a burst of color and freshness.
– Lime Wedges: Serve with lime wedges for an extra squeeze of citrus over the top.
Pairing Ideas for a Complete Meal Experience
To complement your crispy oven-baked fish tacos, consider serving them with:
– Sides: Mexican rice, black beans, or a fresh corn salad.
– Beverages: Pair with a light beer, a refreshing margarita, or a citrus-infused sparkling water to enhance the meal.
Nutritional Benefits of Fish Tacos
Fish tacos are not only delicious but also a healthy meal choice. Here’s why:
Overview of Health Benefits
Fish is an excellent source of lean protein, omega-3 fatty acids, and essential nutrients. These fatty acids promote heart health, reduce inflammation, and can even improve brain function. By choosing fish as your protein source, you’re making a heart-healthy choice that contributes positively to your overall diet.
Nutritional Value of Ingredients Used
– Fish: Rich in protein and omega-3s, providing essential nutrients for muscle repair and cognitive function.
– Greek Yogurt: A great source of probiotics, calcium, and protein, making it a healthy alternative to sour cream.
– Vegetables: Cabbage, tomatoes, and avocados contribute vitamins, minerals, and fiber, enhancing the nutritional profile of your meal.
Balanced Meal Option
This dish is well-balanced, offering carbohydrates from the tortillas, protein from the fish, healthy fats from the avocado, and a plethora of vitamins from the vegetables. Enjoying fish tacos can fit perfectly into a healthy eating plan.
Conclusion
Crispy oven-baked fish tacos are a delightful culinary experience that blends fresh ingredients, flavors, and textures. From the homemade Greek yogurt dressing to the perfectly warmed tortillas, each step enhances the dish’s appeal.
Encouraging you to try making these tacos at home, remember that they are incredibly versatile and can be customized to suit your culinary preferences. Enjoy them at a casual dinner with friends or as a quick weeknight meal. No matter the setting, these fish tacos are sure to impress!