Crispy Golden Buttermilk Fried Chicken Sandwiches: A Comfort Food Classic
There’s something undeniably comforting about a crispy fried chicken sandwich. For many, this dish evokes nostalgic memories of family gatherings, particularly Sunday dinners where the tantalizing aroma of fried chicken filled the air, creating an atmosphere of anticipation and joy. The sound of sizzling chicken in hot oil combined with the laughter of loved ones creates a sensory experience that no one forgets. Today, I want to share with you my recipe for Crispy Golden Buttermilk Fried Chicken Sandwiches, a dish that not only bursts with flavor but also brings people together, making it perfect for any occasion—from backyard barbecues to cozy family dinners.
The allure of this sandwich lies in its simplicity and the ability to elevate everyday ingredients into something extraordinary. The star of the show is undeniably the chicken, marinated in a rich and tangy buttermilk mixture that infuses each bite with moisture and flavor. This recipe is not just about cooking; it’s about creating memories and fostering connections over a shared meal.
The Importance of the Buttermilk Marinade
The key to achieving that flavorful, crispy chicken is the buttermilk marinade. Buttermilk acts as a natural tenderizer, breaking down the proteins in the chicken and ensuring that it remains juicy during the frying process. This is crucial for achieving that perfect texture—a crispy exterior that gives way to succulent meat inside. The addition of hot sauce and a blend of seasonings in the marinade not only enhances the flavor but also adds a bit of complexity to the overall taste profile of the chicken.
As we prepare to embark on this culinary journey, it’s essential to pay attention to the details. From the seasoning blend that you choose to the toppings that you pile onto your sandwich, each element contributes to the final experience. Let’s roll up our sleeves and get ready to create something truly special!
Gathering Ingredients for Your Fried Chicken Sandwiches
Before diving into the cooking process, let’s ensure you have everything you need. Here’s the list of ingredients required for marinating the chicken, creating the dredging mixture, frying, and assembling the sandwiches:
For the Chicken Marinade:
– 2 lbs chicken thighs (bone-in, skin-on preferred for maximum flavor and juiciness)
– 2 cups buttermilk (the secret to tender, flavorful chicken)
– 1 tablespoon hot sauce (optional, but it adds a nice kick)
– 1 teaspoon garlic powder
– 1 teaspoon onion powder
– 1 teaspoon paprika
– ½ teaspoon salt
– ½ teaspoon black pepper
The chicken thighs are an excellent choice for this recipe; their higher fat content compared to chicken breasts ensures that they remain moist and flavorful even after frying. If you prefer, you can also use chicken breasts, but be aware that you may need to adjust your cooking time to avoid drying them out.
For the Dredging Mixture:
– 1 cup all-purpose flour
– 1 tablespoon cornstarch (this helps create that extra crispy texture)
– 1 teaspoon paprika
– 1 teaspoon garlic powder
– ½ teaspoon cayenne pepper (adjust based on your spice preference)
The dredging mixture is where the magic happens. Combining flour and cornstarch creates a coating that is not only crispy but also light, allowing the chicken to shine through. The seasonings in the dredging mix will complement the flavors of the marinade, creating a harmonious balance in each bite.
Preparing the Marinade
Now that we have our ingredients ready, it’s time to prepare the marinade. In a large mixing bowl, combine the buttermilk, hot sauce, garlic powder, onion powder, paprika, salt, and black pepper. Whisk the ingredients together until they are well combined, ensuring that the spices are evenly distributed throughout the buttermilk.
Once the marinade is mixed, add the chicken thighs to the bowl, making sure they are fully submerged in the buttermilk mixture. This step is crucial, as you want the chicken to soak up all the flavors during the marinating process. Cover the bowl with plastic wrap and refrigerate for at least 4 hours, or ideally overnight. This extended marinating time allows the chicken to absorb the flavors and ensures it remains juicy during cooking.
Dredging the Chicken
After the chicken has marinated, it’s time to prepare for frying. Remove the chicken from the refrigerator and let it sit at room temperature for about 30 minutes before frying. This step helps to ensure even cooking. While the chicken is resting, you can prepare the dredging mixture. In a shallow dish, combine the all-purpose flour, cornstarch, paprika, garlic powder, and cayenne pepper. Mix these dry ingredients together until well combined.
Next, it’s time to coat the chicken. Using tongs, remove each piece of chicken from the buttermilk marinade, allowing any excess liquid to drip off. Dredge each piece in the flour mixture, ensuring that it is thoroughly coated. Press the flour onto the chicken to create a good crust, then shake off any excess. For an extra crunchy coating, you can double-dip the chicken by returning it to the buttermilk marinade and then dredging it in the flour mixture a second time.
The Frying Process
Once your chicken is fully coated, it’s time to fry. In a large, deep skillet or Dutch oven, heat about 2 inches of vegetable oil over medium-high heat. To test if the oil is hot enough, you can drop a small amount of the dredging mixture into the oil; if it sizzles immediately, you’re ready to go.
Carefully add the chicken pieces to the hot oil, making sure not to overcrowd the pan. Fry the chicken in batches if necessary, maintaining the oil temperature. Cook the chicken for about 8-10 minutes per side, or until it reaches a golden-brown color and the internal temperature registers 165°F on a meat thermometer. Once cooked, transfer the chicken to a wire rack set over a baking sheet to drain any excess oil.
Assembly of the Sandwiches
While the chicken is frying, you can prepare your sandwich components. Choose your preferred bread—brioche buns are an excellent option for their softness and slight sweetness. Toast the buns lightly on a skillet or in the oven for added texture.
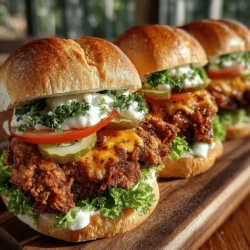
Once the chicken is fried and the buns are prepared, it’s time to assemble your Crispy Golden Buttermilk Fried Chicken Sandwiches. Start by placing a piece of the fried chicken on the bottom half of the bun, then layer on your favorite toppings. Classic options include crisp lettuce, sliced tomatoes, pickles, and a drizzle of mayo or your favorite sauce.
Stay tuned for the next part of this article, where we will explore the art of customizing your sandwiches and perfecting the accompanying sides!
{{image_2}}
Preparing the Chicken: Marination to Perfection
The journey to crispy, golden fried chicken sandwiches begins with marinating the chicken thighs. This crucial step ensures that your chicken is not only flavorful but also tender and juicy.
Marinating the Chicken
In a large mixing bowl, whisk together the following ingredients to create a delicious marinade:
– 1 cup buttermilk
– 2 tablespoons hot sauce (optional for those who like a kick)
– 1 teaspoon garlic powder
– 1 teaspoon onion powder
– 1 teaspoon paprika
– 1 teaspoon salt
– ½ teaspoon black pepper
Once mixed thoroughly, submerge the chicken thighs into the marinade, ensuring each piece is well-coated. Cover the bowl with plastic wrap and refrigerate for at least four hours; overnight is ideal for deeper flavor absorption.
Preparing the Dredging Mixture
While your chicken marinates, take the time to prepare your dredging mixture. In a separate bowl, combine:
– 2 cups all-purpose flour
– ½ cup cornstarch
– 2 teaspoons paprika
– 1 teaspoon garlic powder
– ½ teaspoon cayenne pepper (adjust for spice preference)
– 1 teaspoon salt
– ½ teaspoon black pepper
Stir these dry ingredients until they are evenly mixed. This blend will give your chicken that crispy, crunchy exterior that contrasts perfectly with the juicy meat inside.
Dredging the Chicken
After marinating, remove the chicken from the refrigerator. Allow any excess marinade to drip off. Dredge each piece in the flour mixture, pressing gently to ensure the coating adheres well. Shake off any excess flour and place the coated chicken on a wire rack. Let it rest for a few minutes; this resting period is vital as it helps the coating stick better during frying.
Frying the Chicken: Achieving Golden Perfection
With your chicken marinated and dredged, it’s time to fry! This step is where the magic happens.
Heating the Oil
In a large skillet or Dutch oven, pour enough vegetable oil to fill the pan about an inch deep. Heat the oil over medium-high heat until it reaches 350°F (175°C). You can use a deep-fry thermometer to monitor the temperature accurately.
Frying the Chicken
Carefully lower the chicken thighs into the hot oil, working in batches to avoid overcrowding, which can lead to uneven cooking. Fry each piece for about 7-10 minutes on each side, or until they are golden brown and reach an internal temperature of 165°F (74°C).
Once cooked, transfer the fried chicken to a plate lined with paper towels to drain any excess oil. This step is crucial; it prevents sogginess and keeps your chicken crispy.
Toasting the Buns: The Final Touch
While your chicken is draining, it’s a perfect time to toast your brioche buns. The toasted buns not only add texture but also enhance the overall flavor of the sandwich.
Toasting Method
You can either toast the buns in a separate skillet over medium heat or place them under the broiler for a few minutes. Whichever method you choose, keep an eye on the buns to prevent them from burning. You want them to be golden brown and slightly crispy.
Assembling the Sandwich: Layering the Flavors
With your chicken fried and buns toasted, it’s time to assemble your crispy golden buttermilk fried chicken sandwiches. This is where you can get creative and add your personal touch.
Ingredients for Assembly
For each sandwich, you will need:
– 1 toasted brioche bun
– 1 crispy fried chicken thigh
– 1 leaf of fresh butter lettuce
– 1 slice of tomato
– A few dill pickle slices
– 1 tablespoon mayonnaise (optional)
– Optional toppings: sliced avocado or cheese of your choice
Assembly Steps
1. Start by spreading a thin layer of mayonnaise on the bottom half of the toasted brioche bun. This adds a creamy texture and richness to your sandwich.
2. Place a leaf of butter lettuce on top of the mayonnaise. The lettuce not only adds crunch but also freshness to balance the richness of the chicken.
3. Add the fried chicken thigh next, allowing its crispiness to shine.
4. Layer a slice of juicy tomato over the chicken, followed by a few dill pickle slices for that perfect tangy contrast.
5. If you’re feeling adventurous, add sliced avocado or cheese for an extra layer of flavor.
6. Top it all off with the other half of the brioche bun.
Tips for Best Results
Achieving the perfect crispy buttermilk fried chicken sandwiches requires attention to detail. Here are some tips to elevate your dish:
1. Marination Time: The longer you marinate the chicken, the more flavorful and tender it will be. Aim for at least four hours, but overnight is best.
2. Oil Temperature: Maintaining the right oil temperature is crucial for frying. If the oil is too cool, the chicken will absorb more oil and become greasy. If it’s too hot, the outside may burn before the inside cooks through.
3. Batch Frying: Fry the chicken in batches to prevent overcrowding. This ensures even cooking and helps maintain the oil temperature.
4. Resting the Chicken: Letting the fried chicken rest on a wire rack allows excess oil to drain and keeps the coating crispy.
5. Bun Choice: Brioche buns are ideal due to their soft texture and slight sweetness, which complements the savory chicken beautifully.
6. Serving Suggestions: Pair your chicken sandwiches with classic sides like coleslaw, French fries, or potato salad for a complete meal.
Common Questions
Q: Can I use chicken breasts instead of thighs?
A: Yes, you can use chicken breasts, but thighs tend to be juicier and more forgiving during the frying process. If using breasts, consider pounding them to an even thickness for consistent cooking.
Q: How can I make this recipe gluten-free?
A: Substitute all-purpose flour with a gluten-free flour blend and ensure your cornstarch is gluten-free. Additionally, check that your other ingredients are compliant with gluten-free standards.
Q: Can I prepare the chicken ahead of time?
A: Absolutely! You can marinate the chicken a day in advance and fry it just before serving. This helps in planning ahead for gatherings or busy weeknights.
Conclusion
Crispy golden buttermilk fried chicken sandwiches are a delightful treat that combines flavors and textures in a way that is sure to satisfy any craving. With the juicy, tender chicken, crispy coating, and fresh toppings nestled in a soft brioche bun, each bite is a burst of flavor that delights the senses.
Whether you’re preparing a meal for a special occasion or simply indulging in comfort food at home, this fried chicken sandwich recipe is sure to impress. Don’t hesitate to get creative with your toppings and sides!
Try this recipe today and enjoy the savory goodness of homemade crispy buttermilk fried chicken sandwiches. Your taste buds will thank you!