Indulge in Flavor: Charcuterie Board Nachos Recipe
The culinary world is filled with delightful innovations that tantalize the taste buds, and one such creation that stands out is Charcuterie Board Nachos. This dish brilliantly marries the beloved classic nacho with the sophisticated elements of a gourmet charcuterie board, resulting in a spectacular appetizer that is both visually stunning and packed with flavor. Whether you’re hosting a lively gathering, cheering on your favorite team during game day, or simply enjoying a quiet evening at home, Charcuterie Board Nachos are sure to impress your guests and satisfy your cravings.
Understanding Charcuterie Board Nachos
To appreciate the allure of Charcuterie Board Nachos, it’s essential to grasp the concept of charcuterie itself. Charcuterie refers to the art of preparing and assembling cured meats, cheeses, and accompaniments. Traditionally rooted in French cuisine, charcuterie boards often feature an array of delectable items such as prosciutto, salami, artisan cheeses, olives, and nuts, all beautifully arranged to create an inviting presentation. This culinary style emphasizes the quality of ingredients and the experience of sharing food, making it perfect for gatherings and celebrations.
On the other hand, nachos have a rich history in American cuisine. They are believed to have originated in the 1940s in Mexico, when a group of U.S. Army wives were served a dish of tortilla chips topped with cheese and jalapeños. This simple yet satisfying snack quickly gained popularity and evolved into various forms, becoming a staple in bars and restaurants across the United States. The combination of crunchy chips, melty cheese, and savory toppings has made nachos a quintessential comfort food.
Combining the elements of charcuterie with nachos creates an exciting fusion that elevates the traditional snack into a gourmet experience. The benefits of this combination are manifold: it allows for a broader array of flavors and textures, incorporates high-quality ingredients, and offers a visually appealing presentation that is perfect for sharing. By blending the casual nature of nachos with the elegance of a charcuterie board, you can create a dish that delights both the eyes and the palate.
Ingredients Overview
Before diving into the preparation of Charcuterie Board Nachos, let’s take a closer look at the key ingredients that will elevate this dish to new heights.
Tortilla Chips: The foundation of any nacho dish, tortilla chips come in various types and brands. While classic corn tortilla chips are the most common choice, you might also explore flavored options or even homemade versions for a personal touch. The crunchiness and sturdiness of the chips are crucial, as they need to hold up against the toppings without becoming soggy.
Cheeses: The choice of cheese can make or break your nachos. A blend of sharp cheddar and creamy mozzarella is ideal, as the cheddar adds a robust flavor while the mozzarella provides that irresistible meltiness. Other options to consider include pepper jack for a spicy kick or goat cheese for a tangy twist. The key is to select cheeses that not only melt well but also complement the other ingredients.
Meats: Charcuterie Board Nachos shine with an assortment of cured meats. Prosciutto, with its delicate and slightly sweet profile, pairs beautifully with the salty savoriness of salami and the spiciness of pepperoni. Each meat contributes its unique texture and flavor, creating a harmonious balance that enhances the overall dish.
Vegetables and Garnishes: Freshness is essential when it comes to the vegetables you choose for your nachos. Sliced jalapeños add a spicy kick, while olives provide a briny contrast. Diced tomatoes and chopped herbs like cilantro or parsley not only add color but also a burst of freshness that brightens the dish. Don’t forget to include an assortment of garnishes that can be added after baking for an extra layer of flavor and texture.
Dipping Options: To complete your Charcuterie Board Nachos, consider offering a variety of dipping options. Sour cream is a classic choice, providing a cool and creamy element that balances the richness of the cheese and meats. For those who enjoy a bit of heat, a spicy mustard or aioli can add a flavorful punch that enhances the entire experience.
Preparation Steps for Charcuterie Board Nachos
Now that you have a clear understanding of the ingredients, it’s time to start preparing your Charcuterie Board Nachos. The first step in this culinary adventure is preheating your oven. Setting the right temperature is crucial for optimal melting and to ensure that your nachos achieve that perfect golden-brown finish.
Preheat your oven to 350°F (175°C). This moderate temperature allows the cheese to melt evenly without burning the chips. While the oven heats up, you can begin assembling the components of your nachos. Start by spreading a generous layer of tortilla chips on a large baking sheet or oven-safe platter. Ensure they are evenly distributed, as this will provide a solid base for your toppings.
Once the chips are arranged, it’s time to layer on your cheeses. Start with a good sprinkling of shredded cheddar, followed by dollops of mozzarella. The combination of these two cheeses will create a delightful melty texture that binds the other ingredients together. After adding the cheese, it’s time to introduce the meats. Scatter slices of prosciutto, salami, and pepperoni over the cheesy chips, ensuring that every bite will be filled with savory goodness.
Next, add your fresh vegetables. Distribute the sliced jalapeños, olives, and tomatoes evenly across the nachos, making sure to incorporate a variety of colors for visual appeal. Finally, sprinkle fresh herbs over the top for an aromatic finish.
As the oven reaches its desired temperature, slide the baking sheet into the oven and allow the nachos to bake for about 10 to 15 minutes, or until the cheese is bubbly and starting to brown. This is the moment when all the flavors meld together, creating an irresistible aroma that will have everyone eagerly anticipating the first bite.
Stay tuned for the next part of this article, where we will explore additional steps, tips, and the finishing touches that will elevate your Charcuterie Board Nachos to gourmet status.
{{image_2}}
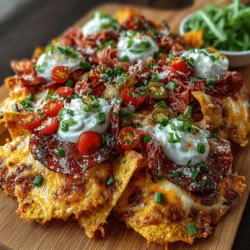
Creating the perfect Charcuterie Board Nachos is a culinary adventure that combines the best elements of a charcuterie board with the beloved comfort of nachos. This dish is not just about great flavors but also about presentation and how each layer contributes to the overall experience. In this section, we will delve into the essential steps to achieve the ultimate nacho experience, discuss serving suggestions, and explore nutritional insights.
Layering Tortilla Chips
The foundation of great nachos starts with the tortilla chips. Achieving the perfect base without overcrowding is essential for a balanced bite and even melting of cheese.
– Choose the Right Chips: Opt for sturdy tortilla chips that can hold the weight of toppings without breaking. Look for thicker, restaurant-style chips or make your own for a personalized touch.
– Layering Technique: Spread a single layer of chips across your baking sheet or oven-safe dish. Avoid piling them too high; a single layer allows for even cheese distribution and ensures every chip gets its fair share of toppings. If you have a large quantity, consider baking in batches.
– Spacing: Allow slight gaps between chips to enable heat circulation during baking. This will help achieve that ideal crispy texture.
Cheese Application
Cheese is the star of the show in nachos, and proper application techniques will ensure that it melts evenly and covers all your ingredients.
– Cheese Selection: A blend of cheeses works best for depth of flavor. Opt for a combination of sharp cheddar, Monterey Jack, and a sprinkle of mozzarella for extra stretchiness.
– Shredding: Freshly shredded cheese melts better than pre-packaged shredded cheese, which often contains anti-caking agents. Grate your cheese with a box grater or food processor for optimal melting.
– Layering the Cheese: Sprinkle a generous amount of cheese evenly over the first layer of chips. For a cheesier experience, add another layer of chips followed by more cheese before baking. This creates gooey, cheesy layers that enhance every bite.
Meat Layering
When it comes to adding meats to your nachos, distribution is key to ensuring every chip is a flavor-packed experience.
– Types of Meat: Choose meats that complement the cheese and add texture. Sliced salami, prosciutto, pepperoni, and cooked sausage or chicken are excellent choices.
– Cutting and Distributing: Slice or tear meats into bite-sized pieces. Distribute them evenly across the cheese layer; this way, each chip will have a bit of meat, ensuring balanced bites and a satisfying experience.
– Layering Strategy: Consider layering some of the meat beneath the cheese. This allows the cheese to melt over the meat, locking in flavors and creating a deliciously gooey topping.
Veggie Addition
Fresh vegetables not only enhance the flavor profile but also add a pop of color to your nachos.
– Choosing Vegetables: Opt for vibrant veggies like diced tomatoes, sliced jalapeños, green onions, and bell peppers. These add freshness and a crunch that contrasts beautifully with the creamy cheese.
– Layering for Impact: Distribute vegetables evenly on top of the meat and cheese layers. This not only adds visual appeal but also ensures that the flavors meld together during baking.
– Fresh vs. Roasted: For a different flavor profile, roast some vegetables like bell peppers or corn before adding them to your nachos. The caramelization brings out their natural sweetness and enhances the overall taste.
Baking to Perfection
Baking nachos requires careful attention to timing and temperature to achieve that gooey, bubbling cheese everyone loves.
– Preheat Your Oven: Set your oven to 350°F (175°C). A moderate temperature ensures that the cheese melts thoroughly without burning the chips.
– Baking Time: Bake your nachos for about 10-15 minutes. Keep an eye on them during the last few minutes; you want the cheese to be fully melted and slightly golden without letting the chips burn.
– Broiling Option: For an extra crispy finish, switch to broil in the last minute of baking. Watch closely, as this can go from perfect to burnt quickly.
Finishing Touches
Once your nachos are out of the oven, the finishing touches elevate the dish from good to great.
– Herbs and Garnishes: Fresh herbs like cilantro or chives sprinkled on top add a burst of flavor and a touch of freshness. Consider adding a dollop of sour cream or guacamole for added creaminess.
– Hot Sauce: A drizzle of your favorite hot sauce will give the nachos an extra kick. Offer a variety of hot sauces on the side for guests to choose from.
Serving Suggestions
Presentation Tips
Presentation matters, especially when serving nachos as a shareable dish.
– Platter or Board: Use a large wooden board or a colorful platter to arrange your nachos. This gives a rustic charm that enhances the overall appeal.
– Layered Display: Consider building a tiered nacho display by stacking some chips on top. This creates height and makes it visually striking.
– Color Contrast: Make sure to arrange colorful veggies and meats to create a visually appealing contrast. A mix of colors not only looks good but also indicates a variety of flavors.
Accompaniments
Pairing your nachos with the right accompaniments enhances the overall experience.
– Fresh Greens: Adding a handful of arugula or mixed greens on the side provides a peppery contrast to the rich flavors of the nachos. The freshness can cleanse the palate between bites.
– Dips: Offer a selection of dips like salsa, guacamole, and queso. These not only complement the nachos but also allow guests to customize their bites.
Pairing Drinks
The right beverage can elevate your nacho experience.
– Beer: A crisp lager or a hoppy IPA pairs wonderfully with nachos, cutting through the richness of cheese and meat.
– Wine: A chilled Sauvignon Blanc or a light-bodied red like Pinot Noir can complement the savory elements of the dish.
– Mocktails: For a non-alcoholic option, consider serving a refreshing limeade or a sparkling water with a splash of fruit juice.
Nutritional Insights
Caloric Breakdown
Understanding the nutritional aspects of your ingredients can help balance indulgence with health.
– Cheese and Meats: These are typically high in calories and fat. A serving of nachos can easily exceed 500 calories, depending on the toppings. While enjoying them, consider portion sizes.
– Vegetables: Adding fresh vegetables can significantly boost the nutrient profile of your nachos, providing vitamins, minerals, and fiber without adding many calories.
Balancing Indulgence
Enjoying nachos can still fit into a balanced diet with some mindful choices.
– Serving Size: Share a platter with friends to enjoy the flavors while keeping individual portions in check.
– Healthier Options: Consider using lower-fat cheeses or leaner meats to reduce calorie density while maintaining taste.
Variations for Dietary Preferences
To cater to various dietary preferences, consider these variations:
– Vegetarian Option: Skip the meats and load up on extra veggies like mushrooms, zucchini, or extra beans for heartiness.
– Gluten-Free: Use gluten-free tortilla chips to cater to gluten-intolerant guests.
– Lighter Versions: Substitute cheese with a mix of nutritional yeast and spices for a dairy-free alternative.
Conclusion
Charcuterie Board Nachos offer a delightful twist on a classic favorite, blending savory meats, rich cheeses, and fresh vegetables in a fun and shareable format. Perfect for any occasion, these nachos are not only satisfying but also allow for creativity in presentation and flavor combinations. Whether shared among friends or enjoyed solo, this recipe is a scrumptious addition to any culinary repertoire. With thoughtful layering, baking techniques, and vibrant accompaniments, your nachos will be the star of the show at any gathering. Embrace the joy of crafting your own nacho masterpiece and indulge in the incredible flavors it brings to the table.